
In a landscape dominated by the "scale-at-all-costs" philosophy—where models like Flux.2 and Hunyuan-Image-3.0 push parameter counts into the massive 30B to 80B range—a new contender has emerged to disrupt the status quo. Z-Image, developed by Alibaba’s Tongyi Lab, has officially launched, shattering expectations with a lean 6-billion parameter architecture that rivals the output quality of industry giants while running on consumer-grade hardware.
Released in late 2025, Z-Image (and its blazing-fast variant Z-Image-Turbo) instantly captivated the AI community, surpassing 500,000 downloads within 24 hours of its debut. By delivering photorealistic imagery in just 8 inference steps, Z-Image is not just another model; it is a democratizing force in generative AI, enabling high-fidelity creation on laptops that would choke on its competitors.
What is Z-Image?
Z-Image is a new, open-source image-generation foundation model developed by the Tongyi-MAI / Alibaba Tongyi Lab research team. It is a 6-billion-parameter generative model built on a novel Scalable Single-Stream Diffusion Transformer (S3-DiT) architecture that concatenates text tokens, visual semantic tokens and VAE tokens into a single processing stream. The design goal is explicit: deliver top-tier photorealism and instruction adherence while drastically reducing inference cost and enabling practical use on consumer-grade hardware. The Z-Image project publishes code, model weights, and an online demo under an Apache-2.0 license.
Z-Image ships in multiple variants. The most widely discussed release is Z-Image-Turbo — a distilled, few-step version optimized for deployment — plus the non-distilled Z-Image-Base (foundation checkpoint, better suited for fine-tuning) and Z-Image-Edit (instruction-tuned for image editing).
The "Turbo" Advantage: 8-Step Inference
The flagship variant, Z-Image-Turbo, utilizes a progressive distillation technique known as Decoupled-DMD (Distribution Matching Distillation). This allows the model to compress the generation process from the standard 30-50 steps down to a mere 8 steps.
Result: Sub-second generation times on enterprise GPUs (H800) and practically real-time performance on consumer cards (RTX 4090), without the "plastic" or "washed-out" look typical of other turbo/lightning models.
4 Key Features of Z-Image
Z-Image is packed with features that cater to both technical developers and creative professionals.
1. Unmatched Photorealism & Aesthetics
Despite having only 6 billion parameters, Z-Image produces images with startling clarity. It excels in:
- Skin Texture: Replicating pores, imperfections, and natural lighting on human subjects.
- Material Physics: Accurately rendering glass, metal, and fabric textures.
- Lighting: Superior handling of cinematic and volumetric lighting compared to SDXL.
2. Native Bilingual Text Rendering
One of the most significant pain points in AI image generation has been text rendering. Z-Image solves this with native support for both English and Chinese.
- It can generate complex posters, logos, and signages with correct spelling and calligraphy in both languages, a feature often absent in Western-centric models.
3. Z-Image-Edit: Instruction-Based Editing
Alongside the base model, the team released Z-Image-Edit. This variant is fine-tuned for image-to-image tasks, allowing users to modify existing images using natural language instructions (e.g., "Make the person smile," "Change the background to a snowy mountain"). It maintains high consistency in identity and lighting during these transformations.
4. Consumer Hardware Accessibility
- VRAM Efficiency: Runs comfortably on 6GB VRAM (with quantization) to 16GB VRAM (full precision).
- Local Execution: Fully supports local deployment via ComfyUI and
diffusers, freeing users from cloud dependencies.
How does Z-Image Work?
Single-stream diffusion transformer (S3-DiT)
Z-Image departs from classic dual-stream designs (separate text and image encoders/streams) and instead concatenates text tokens, image VAE tokens and visual semantic tokens into a single transformer input. This single-stream approach improves parameter utilization and simplifies cross-modal alignment inside the transformer backbone, which the authors say yields a favorable efficiency/quality tradeoff for a 6B model.
Decoupled-DMD and DMDR (distillation + RL)
To enable few-step (8-step) generation without the usual quality penalty, the team developed a Decoupled-DMD distillation approach. The technique separates CFG (classifier-free guidance) augmentation from distribution matching, allowing each to be optimized independently. They then apply a post-training reinforcement learning step (DMDR) to refine semantic alignment and aesthetics. Together these produce Z-Image-Turbo with far fewer NFEs than typical diffusion models while retaining high realism.
Training throughput and cost optimisation
Z-Image was trained with a lifecycle optimization approach: curated data pipelines, a streamlined curriculum, and efficiency-aware implementation choices. The authors report completing the full training workflow in approximately 314K H800 GPU hours (≈ USD $630K) — an explicit, reproducible engineering metric that positions the model as cost-efficient relative to very large (>20B) alternatives.
Benchmark Results of the Z-Image Model
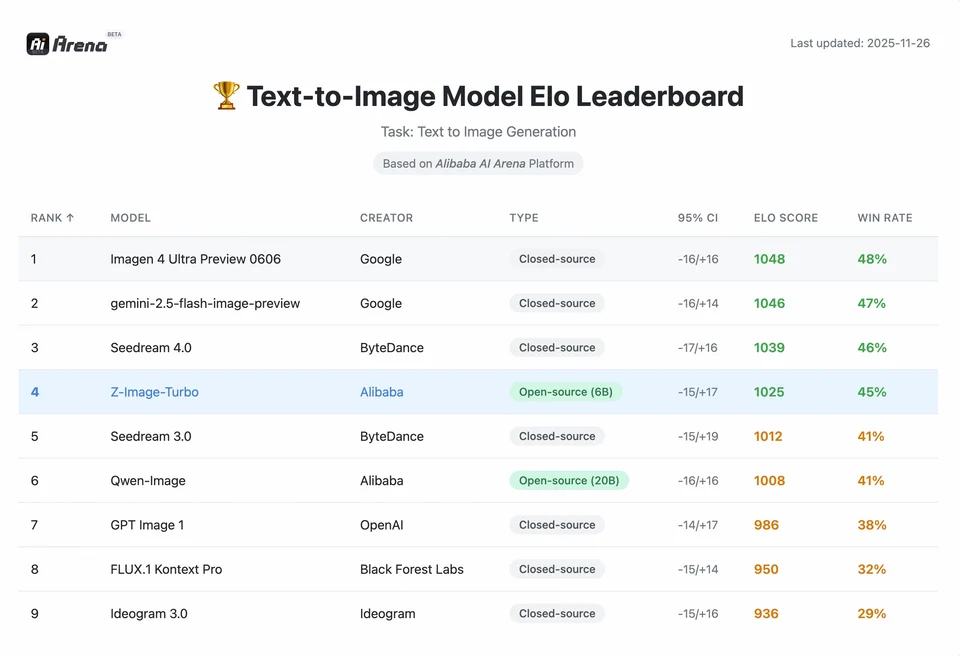
Z-Image-Turbo ranked highly on several contemporary leaderboards, including a top open-source position on the Artificial Analysis Text-to-Image leaderboard and strong performance on Alibaba AI Arena human-preference evaluations.
But real-world quality also depends on prompt formulation, resolution, upscaling pipeline, and additional post-processing.
To understand the magnitude of Z-Image's achievement, we must look at the data. Below is a comparative analysis of Z-Image against leading open-source and proprietary models.
Comparative Benchmark Summary
| Feature / Metric | Z-Image-Turbo | Flux.2 (Dev/Pro) | SDXL Turbo | Hunyuan-Image |
|---|---|---|---|---|
| Architecture | S3-DiT (Single Stream) | MM-DiT (Dual Stream) | U-Net | Diffusion Transformer |
| Parameters | 6 Billion | 12B / 32B | 2.6B / 6.6B | ~30B+ |
| Inference Steps | 8 Steps | 25 - 50 Steps | 1 - 4 Steps | 30 - 50 Steps |
| VRAM Required | ~6GB - 12GB | 24GB+ | ~8GB | 24GB+ |
| Text Rendering | High (EN + CN) | High (EN) | Moderate (EN) | High (CN + EN) |
| Generation Speed (4090) | ~1.5 - 3.0 Seconds | ~15 - 30 Seconds | ~0.5 Seconds | ~20 Seconds |
| Photorealism Score | 9.2/10 | 9.5/10 | 7.5/10 | 9.0/10 |
| License | Apache 2.0 | Non-Commercial (Dev) | OpenRAIL | Custom |
Data Analysis & Performance Insights
- Speed vs. Quality: While SDXL Turbo is faster (1-step), its quality significantly degrades in complex prompts. Z-Image-Turbo hits the "sweet spot" at 8 steps, matching Flux.2's quality while being 5x to 10x faster.
- Hardware Democratization: Flux.2, while powerful, is effectively gated behind 24GB VRAM cards (RTX 3090/4090) for reasonable performance. Z-Image allows users with mid-range cards (RTX 3060/4060) to generate professional-grade, 1024x1024 images locally.
How can developers access and use Z-Image?
There are three typical approaches:
- Hosted / SaaS (web UI or API): Use services like z-image.ai or other providers that deploy the model and expose a web interface or paid API for image generation. This is the fastest route for experimentation without local setup.
- Hugging Face + diffusers pipelines: The Hugging Face
diffuserslibrary includesZImagePipelineandZImageImg2ImgPipelineand provides typicalfrom_pretrained(...).to("cuda")workflows. This is the recommended path for Python developers who want straightforward integration and reproducible examples. - Local native inference from the GitHub repo: The Tongyi-MAI repo includes native inference scripts, optimization options (FlashAttention, compilation, CPU offload), and instructions to install
diffusersfrom source for the latest integration. This route is useful for researchers and teams wanting full control or to run custom training/fine-tuning.
What does a minimal Python example look like?
Below is a concise Python snippet using Hugging Face diffusers that demonstrates text-to-image generation with Z-Image-Turbo.
# minimal_zimage_turbo.pyimport torchfrom diffusers import ZImagePipelinedef generate(prompt, output_path="zimage_output.png", height=1024, width=1024, steps=9, guidance_scale=0.0, seed=42): # Use bfloat16 where supported for efficiency on modern GPUs pipe = ZImagePipeline.from_pretrained("Tongyi-MAI/Z-Image-Turbo", torch_dtype=torch.bfloat16) pipe.to("cuda") generator = torch.Generator("cuda").manual_seed(seed) image = pipe( prompt=prompt, height=height, width=width, num_inference_steps=steps, guidance_scale=guidance_scale, generator=generator, ).images[0] image.save(output_path) print(f"Saved: {output_path}")if __name__ == "__main__": generate("A cinematic portrait of a robot painter, studio lighting, ultra detailed")
Notes:guidance_scale defaults and recommended settings differ for Turbo models; documentation suggests guidance may be set low or zero for Turbo depending on the target behavior.
How do you run image-to-image (edit) with Z-Image?
The ZImageImg2ImgPipeline supports image editing. Example:
from diffusers import ZImageImg2ImgPipelinefrom diffusers.utils import load_imageimport torchpipe = ZImageImg2ImgPipeline.from_pretrained("Tongyi-MAI/Z-Image-Turbo", torch_dtype=torch.bfloat16)pipe.to("cuda")init_image = load_image("sketch.jpg").resize((1024, 1024))prompt = "Turn this sketch into a fantasy river valley with vibrant colors"result = pipe(prompt, image=init_image, strength=0.6, num_inference_steps=9, guidance_scale=0.0, generator=torch.Generator("cuda").manual_seed(123))result.images[0].save("zimage_img2img.png")
This mirrors the official usage patterns and is suitable for creative editing and inpainting tasks.
How should you approach prompts and guidance?
- Be explicit with structure: For complex scenes, structure prompts to include scene composition, focal object, camera/lens, lighting, mood, and any textual elements. Z-Image benefits from detailed prompts and can handle positional / narrative cues well.
- Tune guidance_scale carefully: Turbo models may recommend lower guidance values; experimentation is necessary. For many Turbo workflows,
guidance_scale=0.0–1.0with a seed and fixed steps produces consistent results. - Use image-to-image for controlled edits: When you need to preserve composition but change style/coloring/objects, start from an init image and use
strengthto control the magnitude of change.
Best Use Cases and Best Practices
1. Rapid Prototyping & Storyboarding
Use Case: Film directors and game designers need to visualize scenes instantly.
Why Z-Image? With sub-3-second generation, creators can iterate through hundreds of concepts in a single session, refining lighting and composition in real-time without waiting minutes for a render.
2. E-Commerce & Advertising
Use Case: Generating product backgrounds or lifestyle shots for merchandise.
Best Practice: Use Z-Image-Edit.
Upload a raw product photo and use an instruction prompt like "Place this perfume bottle on a wooden table in a sunlit garden." The model preserves the product's integrity while hallucinating a photorealistic background.
3. Bilingual Content Creation
Use Case: Global marketing campaigns requiring assets for both Western and Asian markets.
Best Practice: Utilize the text rendering capability.
- Prompt: "A neon sign that says 'OPEN' and '营业中' glowing in a dark alley."
- Z-Image will correctly render both the English and Chinese characters, a feat most other models fail at.
4. Low-Resouce Environments
Use Case: Running AI generation on edge devices or standard office laptops.
Optimization Tip: Use the INT8 quantized version of Z-Image. This reduces VRAM usage to under 6GB with negligible loss in quality, making it feasible for local apps on non-gaming laptops.
Bottom line: who should use Z-Image?
Z-Image is designed for organizations and developers who want high-quality photorealism with practical latency and cost, and who prefer open licensing and on-premises or custom hosting. It is particularly attractive to teams that need fast iteration (creative tooling, product mockups, real-time services) and to researchers/community members interested in fine-tuning a compact but powerful image model.
CometAPI offers similarly less restricted Grok Image models , as well as models like Nano Banana Pro, GPT- image 1.5, Sora 2(Can Sora 2 generate NSFW content? How can we try it?) etc—provided you have the right NSFW tips and tricks to bypass the restrictions and start creating freely. Before accessing, please make sure you have logged in to CometAPI and obtained the API key. CometAPI offer a price far lower than the official price to help you integrate.
Ready to Go?→ Free trial for Creating !