


TL;DR
Lovable is an AI-powered development platform that turns natural-language instructions into editable web application code. It helps founders, designers, product teams, and developers build interfaces, connect backend services, and publish applications through an iterative conversation. This guide explains its capabilities, project architecture, and a practical CometAPI integration for a writing assistant. The integration adds model inference to the application you build; it does not establish a way to replace Lovable’s own coding agent. Readers should understand basic HTTP requests and JavaScript, and have access to a Lovable project and a CometAPI account before following the implementation steps.
Key Takeaways
- AI-powered development: Generate and refine applications using natural-language prompts.
- Full-stack capabilities: Build frontend experiences with backend functions, databases, authentication, and hosting.
- Modern architecture: New Lovable projects adopted React-based TanStack Start and SSR in May 2026.
- CometAPI compatibility: Add external model inference via a secure backend function.
- Best use cases: MVPs, AI assistants, internal tools, content applications, and customer portals.
What Is Lovable and How Does It Work?
Lovable (lovable.dev) is an AI-powered platform for building production-grade full-stack web applications using natural language. Its official website and product overview are the starting points for exploring the platform.
You describe what you want in a chat interface, and it generates a working app with:
- Frontend (typically React, TypeScript, Tailwind CSS)
- Backend, database, authentication, and storage (via built-in Lovable Cloud, which is managed Supabase)
- Integrations, deployment, and editable code you own
It supports the full product lifecycle—from prototyping to deployment—and can sync code to GitHub, GitLab, or Bitbucket. It is aimed at founders, product managers, non-developers, and teams who want to move quickly while retaining code ownership. It originated from the open-source GPT Engineer project (founded in Stockholm in 2023 by Anton Osika and Fabian Hedin) and was rebranded/commercialized as Lovable.
How Lovable Turns Prompts Into Applications
- Describe application users, pages, features, and business rules.
- Generate the first app and inspect the preview.
- Connect the database, sign-in, payments, or external APIs.
- Test behavior and refine the code, design, and workflows.
- Publish or continue maintaining the exported application code.
Lovable’s June 1, 2026 engineering article describes the move to React-based TanStack Start and server-side rendering for new projects from May 13, 2026. Existing React + Vite projects keep their earlier architecture; check the actual project before choosing a server-function or Edge Function implementation.
Lovable Technical Specifications
Lovable is an application development platform, not a foundation model. Therefore, parameters, context windows, token throughput, and MMLU scores do not describe Lovable itself. These belong to the specific AI models involved in development or inference.
Can You Configure CometAPI in Lovable?
Yes—inside applications generated with Lovable. CometAPI can handle model requests from a protected backend function. That is distinct from changing which LLM powers Lovable’s own coding agent.
You can integrate CometAPI into applications built with Lovable, provided that the selected models and interfaces are supported.
This does not mean you can directly replace the development proxy model used by Lovable itself.
If your goal is to control which models your application calls, you should configure model routing within your own server-side code.
Lovable’s explanation of internal model orchestration describes how its development agent routes work. The CometAPI integration below concerns application inference; this article does not claim a documented CometAPI setting for that internal agent.
How the Lovable and CometAPI Architecture Works
Lovable supports this in two main ways for the apps you build:
- Secrets (recommended for direct use)
- Store your CometAPI key as a project secret (e.g.,
COMETAPI_KEYorOPENAI_API_KEY). Ask Lovable in the project chat to integrate the API via a secure Edge Function. The key stays server-side and is never exposed in the browser. - Custom connector
- Create a custom connector in the workspace Connectors catalog. Configure the base URL (
https://api.cometapi.com/v1), authentication (Bearer token or custom header), and then add a connection by pasting your CometAPI key. Requests go through Lovable’s connector gateway, keeping credentials encrypted and out of your code.
Notes:
- Lovable’s built-in AI features for apps use Lovable’s own managed keys and consume workspace credits. You cannot swap those for a CometAPI (or other provider) key.
- For external AI calls inside your app (chatbots, generation, etc.), the secrets or custom-connector approach works and bills usage to your CometAPI account instead of Lovable credits.
- There is no evidence of native/pre-built CometAPI support in Lovable’s connector catalog as of the latest documentation; you set it up as a generic OpenAI-compatible or custom API integration.
In short: Lovable is a strong “vibe-coding” / prompt-to-full-stack app builder, and yes—you can configure and use a CometAPI key securely for AI features inside the apps you create with it.
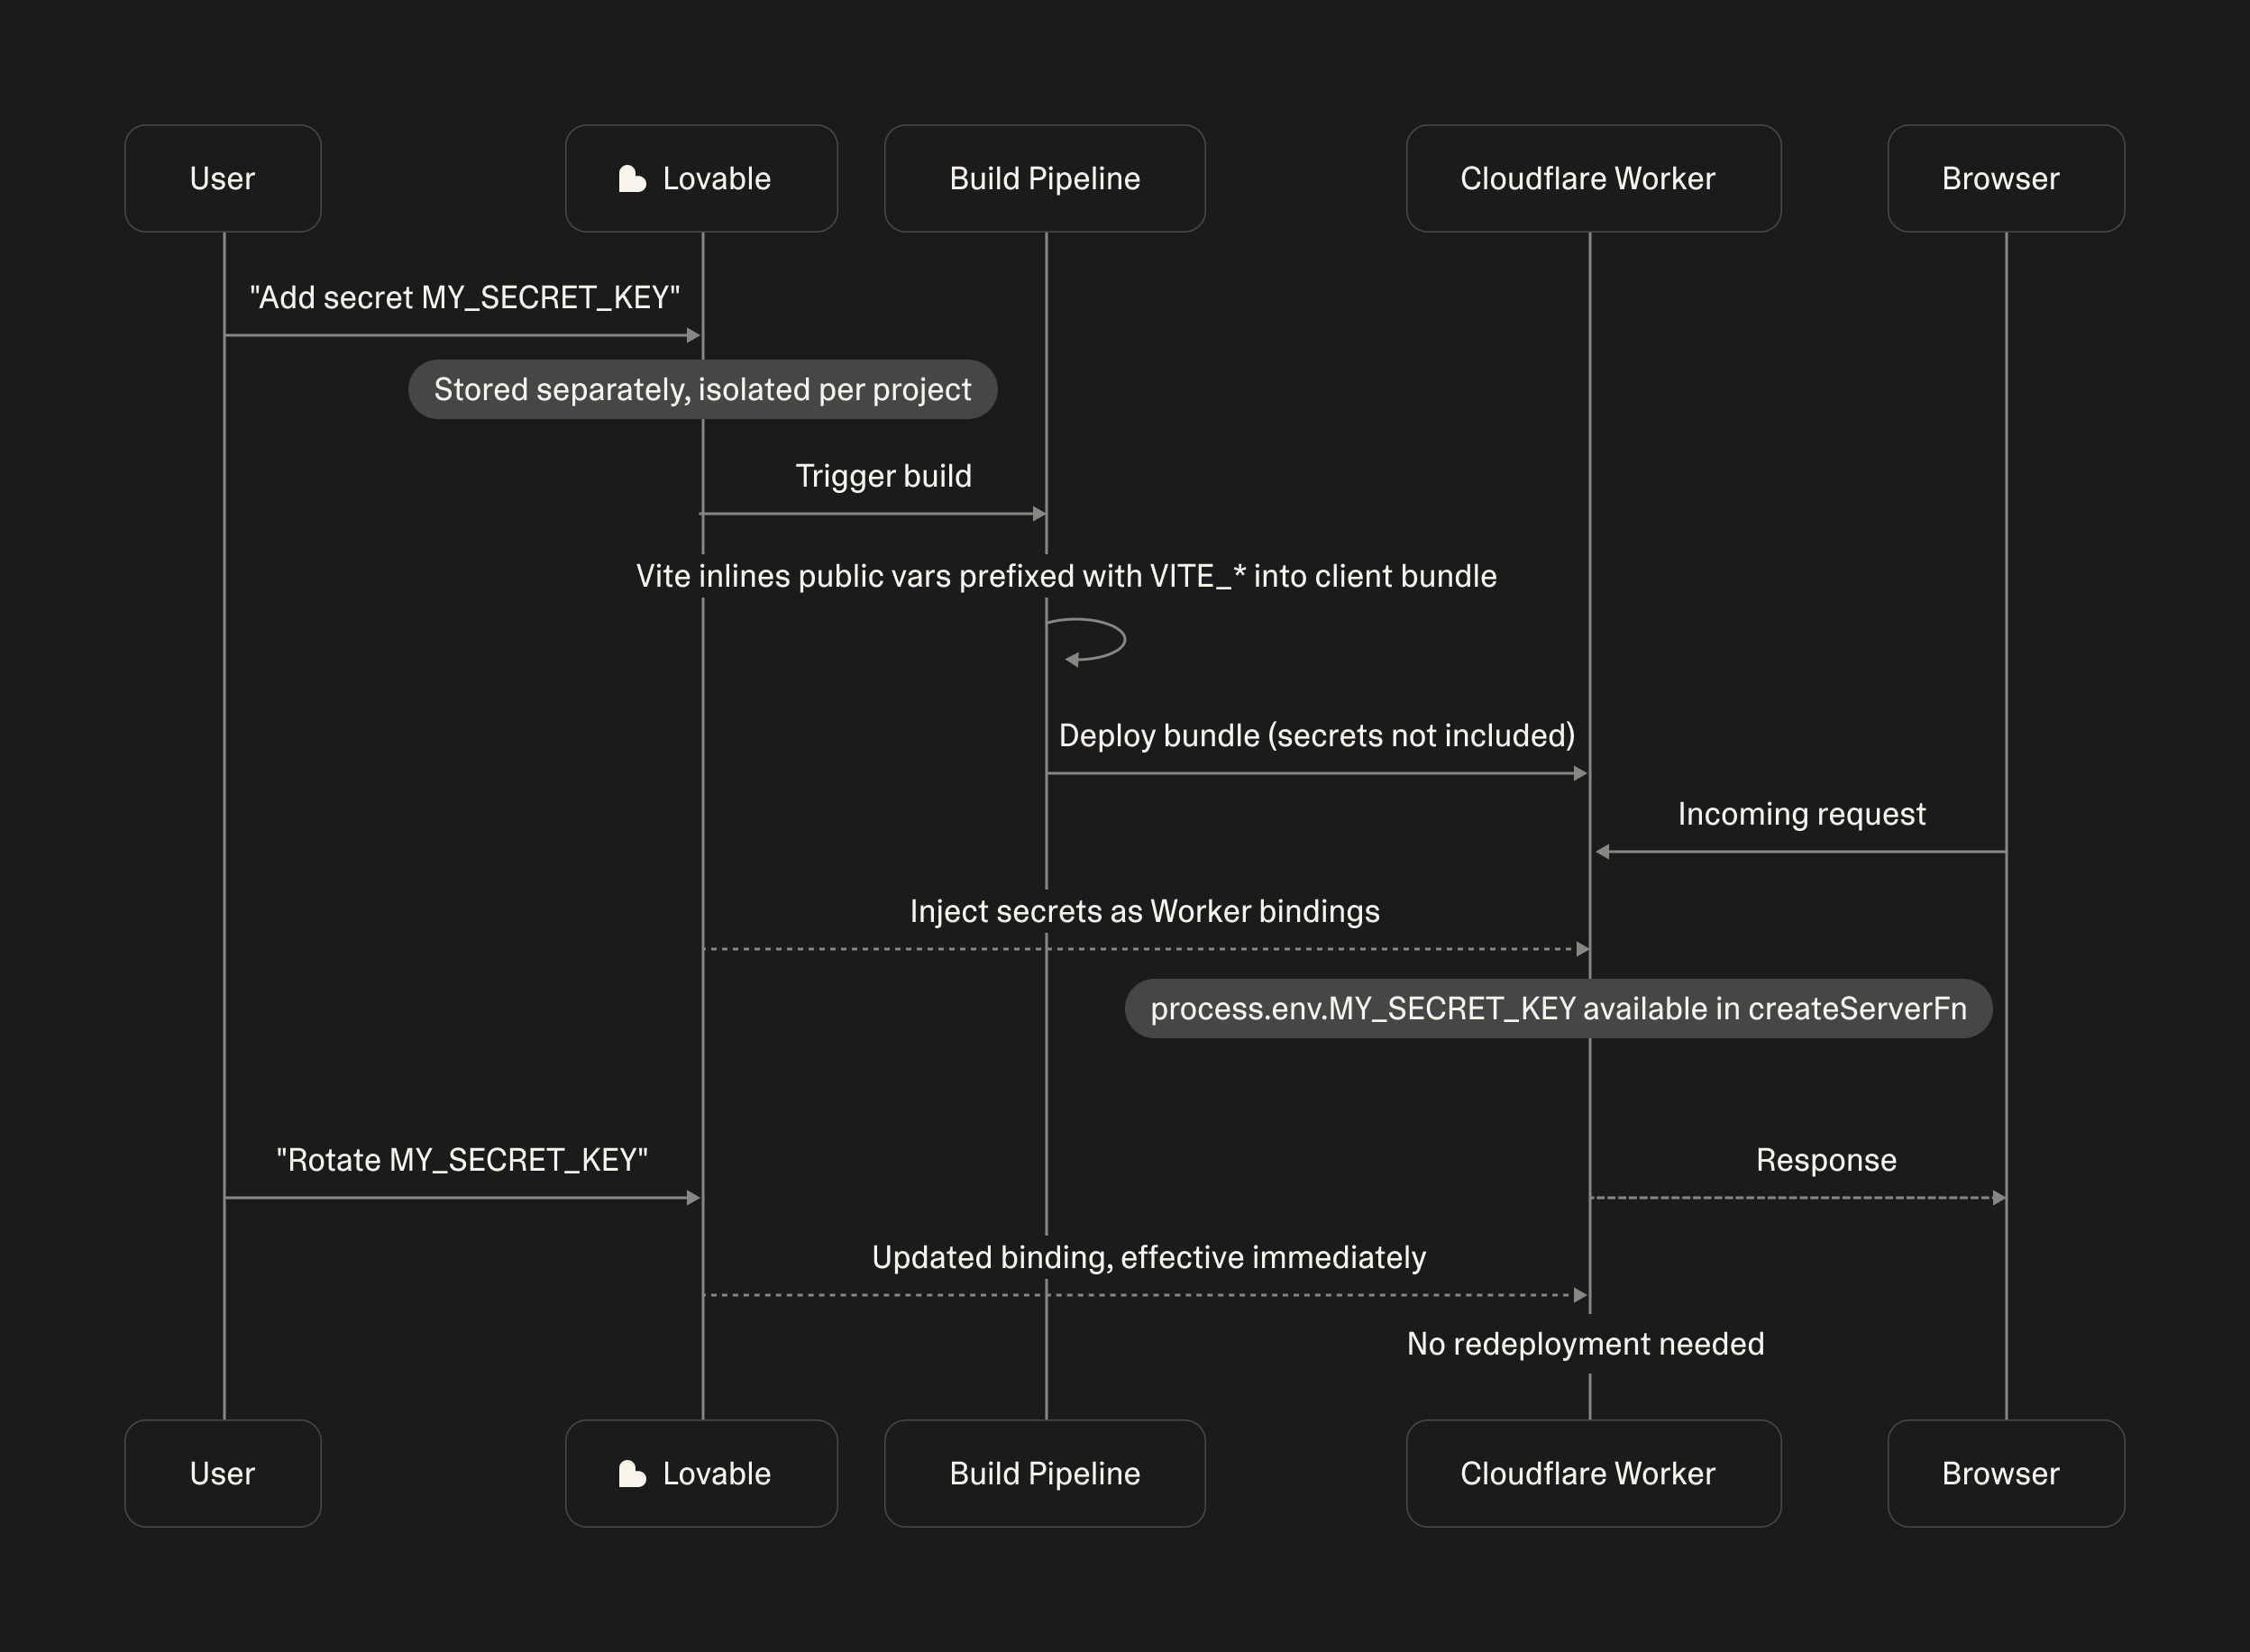
The browser sends input to an application backend. The backend reads a secret, calls CometAPI, and returns the result. Never place private API keys in React components or other client-side code.
How to Build an AI Writing Assistant With Lovable and CometAPI
The following example builds SmartWrite, an AI writing assistant with a text input, tone selection, and a server-side CometAPI request. Choose the TanStack boundary pattern for a newer project or the complete Supabase Edge Function entry point for an older project. Choose one backend implementation matching your project, configure its secrets, and confirm a supported chat model in your CometAPI account. Before publishing, run the example with your own project secrets and a chat model available to your account.
Step 1: Create a Lovable Project
Open https://lovable.dev/ and use this development prompt:
Build a responsive AI writing assistant named SmartWrite.
Include a dashboard, a large prompt box, a tone selector
(Professional / Friendly / Concise), a Generate button,
and an output panel with Copy and Clear controls.
Use a clean responsive design with loading states and errors.
Implement AI generation only through a secure server function.
Never expose API credentials to the frontend.
Do not ship mock AI responses.
Step 2: Configure the CometAPI Credential
Generate a key in your CometAPI account and verify a chat-model ID available to that account. This tutorial uses a direct backend integration, with COMETAPI_API_KEY and COMETAPI_MODEL as server-side configuration. Follow the secret-access mechanism supported by the backend in your generated project.
Configuration example: Where to Store and Use CometAPI Credentials
To connect CometAPI securely, ask Lovable to create a server-side integration and request the API key through its secure input form. You can also manage project secrets under More → Settings → Secrets. For an external Supabase backend, configure secrets in Supabase instead. See the official Lovable Secrets guide.
Follow these four requirements:
- Store and read API keys only on the server. Add
COMETAPI_API_KEYthrough the project's secure Secrets interface. Read it exclusively from server-side secrets or runtime bindings. Never include the key in frontend code, browser-accessible environment variables, chat messages, or screenshots. - Configure on the server using a verified CometAPI model ID. The frontend should send only and . Validate requests against these permitted fields and reject unexpected properties, including , , and . Never allow clients to supply arbitrary API keys or override server-side model configuration.
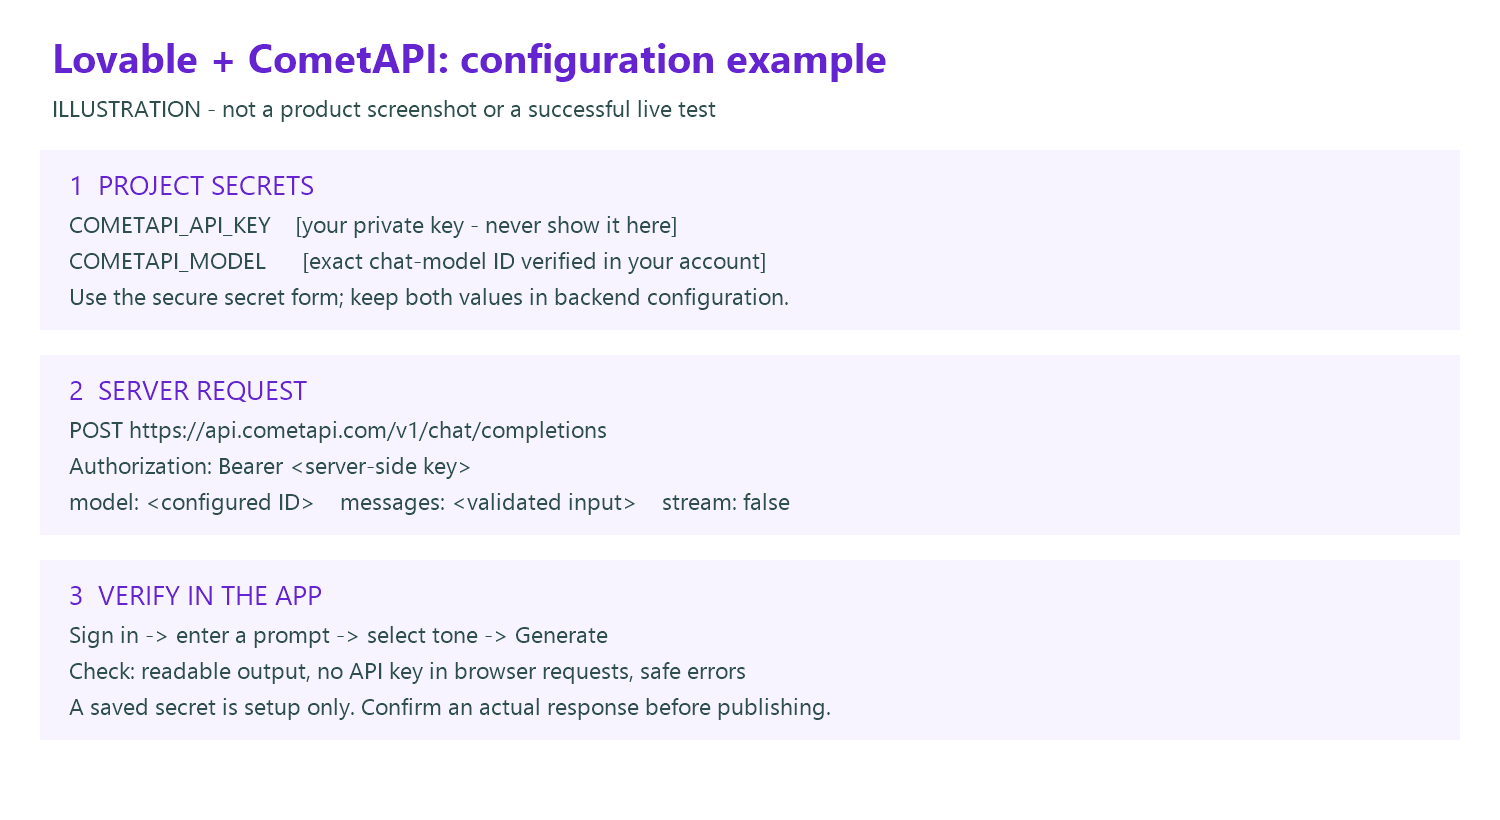
A saved secret does not automatically mean the integration is secure or functional. The integration is ready only when server-side API calls work, client requests cannot override protected settings, and production checks confirm that credentials remain private.
Use the following architecture diagram to identify the frontend-to-backend boundary and the location of protected credentials. The diagram is conceptual rather than a screenshot of Lovable's settings interface.
Prompt to give Lovable
Connect SmartWrite directly to CometAPI through an authenticated backend function. Ask me for COMETAPI_API_KEY in a secure secret form and use COMETAPI_MODEL for the exact model ID I provide. Send POST requests to https://api.cometapi.com/v1/chat/completions from the server only. Accept prompt and tone, validate them, enforce per-user limits, and return only the generated text to the frontend. Use the backend runtime already present in this project. Do not put credentials in chat, frontend code, or browser requests. Do not generate mock success results. Explain how to test the integration and show sanitized errors when it fails.
Lovable also supports managed custom connectors. The instructions here intentionally use the direct-integration path documented in its API integration guide, so they match the server-side helper below.
Step 3: Test the CometAPI Chat Endpoint
From a trusted Bash terminal, set COMETAPI_API_KEY and COMETAPI_MODEL locally, then test POST https://api.cometapi.com/v1/chat/completions. CometAPI’s official request guide documents the base URL, Bearer authentication, and chat response format. Select a model supporting this endpoint; compatibility does not guarantee every provider feature or parameter.
# Set COMETAPI_API_KEY securely in this terminal before running.
# Replace the model value with a chat model verified in your account.
export COMETAPI_MODEL="YOUR_VERIFIED_CHAT_MODEL_ID"
: "${COMETAPI_API_KEY:?Set COMETAPI_API_KEY first}"
curl --fail-with-body --max-time 45 \
  https://api.cometapi.com/v1/chat/completions \
  -H "Authorization: Bearer $COMETAPI_API_KEY" \
  -H "Content-Type: application/json" \
  --data "$(printf '{"model":"%s","messages":[{"role":"user","content":"Write a customer welcome email."}],"stream":false}' "$COMETAPI_MODEL")"
Checkpoint: a successful response contains choices[0].message.content. If authentication fails or the model is unavailable, correct that before connecting the user interface. Do not paste full credentials or private prompts into diagnostic screenshots.
Step 4: Connect CometAPI Through a Secure Backend
Lovable supports two backend architectures:
- New projects (TanStack Start): Use
createServerFnto handle API requests on the server. - Older React + Vite projects: Use Supabase Edge Functions for server-side API calls.
Choose the implementation that matches your project's architecture.
Option A: TanStack Start (New Projects)
Create src/server/writing.functions.ts:
import { createServerFn } from "@tanstack/react-start";

export const generateWriting = createServerFn({ method: "POST" })
  .handler(async ({ data }: { data: { prompt: string } }) => {
    const { env } = await import("cloudflare:workers");

    const res = await fetch(
      "https://api.cometapi.com/v1/chat/completions",
      {
        method: "POST",
        headers: {
          Authorization: `Bearer ${env.COMETAPI_API_KEY}`,
          "Content-Type": "application/json",
        },
        body: JSON.stringify({
          model: env.COMETAPI_MODEL,
          messages: [{ role: "user", content: data.prompt }],
        }),
      }
    );

    if (!res.ok) throw new Error("Generation failed.");

    const result = await res.json();
    return { text: result.choices[0].message.content };
  });
Store COMETAPI_API_KEY and COMETAPI_MODEL as server-side Worker bindings. If your deployment uses another adapter, use its supported secret-access mechanism.
Option B: React + Vite (Older Projects)
Create supabase/functions/generate-writing/index.ts:
import { serve } from "https://deno.land/std@0.224.0/http/server.ts";

serve(async (req) => {
  try {
    const { prompt } = await req.json();
    if (typeof prompt !== "string" || !prompt.trim()) {
      return Response.json({ error: "Invalid prompt" }, { status: 400 });
    }

    const res = await fetch(
      "https://api.cometapi.com/v1/chat/completions",
      {
        method: "POST",
        headers: {
          Authorization: `Bearer ${Deno.env.get("COMETAPI_API_KEY")}`,
          "Content-Type": "application/json",
        },
        body: JSON.stringify({
          model: Deno.env.get("COMETAPI_MODEL"),
          messages: [{ role: "user", content: prompt }],
        }),
      }
    );

    if (!res.ok) throw new Error("CometAPI request failed.");

    const result = await res.json();
    return Response.json({ text: result.choices[0].message.content });
  } catch {
    return Response.json({ error: "Generation failed." }, { status: 500 });
  }
});
Add COMETAPI_API_KEY and COMETAPI_MODEL to Supabase project secrets, then deploy the function.
In both approaches, keep API credentials on the server. Production applications should also implement authentication, input validation, and per-user usage limits.
Step 5: Connect the Lovable Interface
TanStack Start client
import { generate } from "./server/writing.functions";

const { text } = await generate({ data: { prompt, tone } });
// Render text as text content, not as trusted HTML.
React + Vite client
// Use the existing, signed-in Supabase client generated for your project.
const { data, error } = await supabase.functions.invoke("generate-writing", {
  body: { prompt, tone },
});
if (error) throw new Error("Generation failed. Please try again.");
const text = data.text;
Use the client matching your chosen branch. TanStack uses its generated RPC endpoint; Supabase uses the deployed generate-writing function. Neither requires inventing a separate /api/generate route. The browser may send its application session token for authentication, but must never send the private CometAPI credential or a config object. Display loading, failure, and retry states in the interface.
Step 6: Test and Publish the Application
After publishing, test the live URL rather than relying only on the editor preview. Use a private test credential and keep screenshots and evidence free of secret values. Complete these checks before wider access:
- Inspect the built browser JavaScript, source maps, and public configuration for the private CometAPI key. Search locally without printing the key in shared terminal output or saving it in reports. A variable name alone is not evidence of a leaked value.
- Inspect browser Network requests, including payloads, headers, and error responses. The request should contain only the allowed writing inputs and application authentication data; the private CometAPI Authorization header belongs only on the server-to-provider request.
- Review function logs, application logs, monitoring traces, and error reports. Do not record keys, bearer tokens, configuration objects, or full upstream error bodies. If a key has been exposed, revoke and replace it, then remove the exposure before retesting.
- Try signed-out and expired-session requests; both must be rejected before a provider call. Submit apiKey, config, or model as an extra field and verify rejection. Test empty and oversized prompts, an invalid tone, provider failures, and your deployed per-user quota.
- Confirm a valid signed-in request produces text with your selected model. Record the deployment version and sanitized pass/fail results; the examples do not establish that your own deployment has passed these checks.
What Can You Build With Lovable and CometAPI?
- Normal prompts produce readable model responses.
- Blank and oversized prompts are rejected safely.
- API credentials never appear in the browser network panel.
- Model outages return non-sensitive error messages.
- Authenticated users have request limits and activity monitoring.
- The layout behaves correctly on desktop and mobile.
These are suggested project patterns, not claims about completed or independently benchmarked deployments.
FAQ
How should a multi-tenant app prevent one customer’s records from appearing in another customer’s AI response?
Derive the tenant and user identity from the verified server session, then scope every database lookup before assembling model context. Never trust a tenant ID supplied by the browser or rely on a prompt instruction to enforce access. Where supported, add row-level database policies and verify them with two test accounts. Test record IDs, search results, exported files, and conversation history for cross-tenant access. This is an application design recommendation; generated code and platform scans do not establish that the policy is correct.
When is retrieval-augmented generation preferable to putting documents directly into every prompt?
Use retrieval when the document collection is too large to send each time, changes frequently, or needs source-level traceability. Parse and index the documents, retrieve a small relevant set, and attach source identifiers to the answer. Retrieval still needs evaluation: a fluent answer can cite an irrelevant passage. Keep access filters in the retrieval query and test questions whose answers are absent. For a small, stable document, direct context can be a simpler starting point.
How can streaming be added without displaying broken or misleading responses?
Treat streaming as a separate transport feature, not a one-line replacement of stream: false. Confirm the selected model’s streaming format, have the backend relay events, and handle partial chunks, cancellation, timeouts, and connection loss in the UI. Mark an interrupted response as incomplete and let the user retry deliberately. Avoid displaying streamed text as trusted HTML. Test on the published hosting path because intermediaries can buffer a stream that appeared to work locally.
What should a fallback policy check before switching to another model?
Define which failures justify a retry or fallback, then check whether the alternative supports the same endpoint, instructions, tool schema, and output format. Keep retries bounded and avoid silently changing models for workflows needing consistent behavior. Evaluate the fallback on representative prompts, including refusal and malformed-output cases. If model output triggers an external action, protect that action with a separate confirmation or idempotency rule so a retried generation cannot repeat it.
What evidence should a team keep before promoting an AI feature from a pilot to regular use?
Keep a versioned evaluation set with expected behaviors, model and prompt configuration, redacted request metadata, and records of failed cases. Define acceptance criteria for factual accuracy, response shape, latency, and access boundaries; compare results after model or prompt changes. For sensitive inputs, decide what can be transmitted and retained before enabling the feature. These are suggested engineering controls, not claims that Lovable or CometAPI guarantees a particular regulatory outcome.
Conclusion: Is Lovable Worth Using?
Lovable makes it easier to translate ideas into functioning web applications. Its full-stack tooling and external integrations are particularly useful for quickly validating product concepts. CometAPI adds a flexible route for model inference in chat, writing, analytics, and other AI-powered workflows.
Start with a small, secured application, test the CometAPI connection, review the generated code, and expand after the core experience proves reliable.