How to Deploy Kimi K3.1 Pro Locally: Hardware Requirements, vLLM Setup
Learn how to self-host Kimi K3.1 Pro with vLLM, check GPU requirements, download weights, test inference, and compare local deployment with API access.
Deploy Kimi K3.1 Pro on a Linux GPU server, then connect a local application to its inference endpoint. This walkthrough uses one eight-GPU NVIDIA B300 node with vLLM. You will need shell access to the server, compatible drivers, and storage for the complete checkpoint. Start by completing one short text request before testing longer inputs or agent workflows.
Without suitable GPUs, you can run your application locally and connect it to the official Kimi API or a third-party provider such as CometAPI.
Key Takeaways
The model’s 104B active parameters do not represent its full storage requirement.
Hardware compatibility includes GPU memory, interconnects, quantization support, and inference kernels.
Reviewed for clarity, source attribution and current API terminology.
Strong benchmark results make the model worth testing, but they do not guarantee equivalent performance in your application.
A working inference endpoint does not automatically include a browser, code sandbox, or complete agent runtime.
Compare self-hosting and API access by cost per successful task, including retries and maintenance.
What Is Kimi K3.1 Pro?
Kimi K3.1 Pro is Moonshot AI’s open-weight multimodal model for coding, document analysis, and tool use. Its main specifications are listed below, based on the official model card .
The model activates 104B parameters per token, but deployment still requires the full 2.8T-parameter checkpoint. The inference engine must also support its KDA and Gated DSA layers and MXFP4 quantization.
What Hardware Do You Need to Run Kimi K3.1 Pro Locally?
The table below summarizes the vLLM configurations relevant to this guide. The walkthrough uses one eight-GPU B300 node; GB300 and AMD deployments require their corresponding configurations.
Hardware
Documented route
Planning notes
NVIDIA B300
One eight-GPU node, TP8
Baseline for the walkthrough below
NVIDIA GB300
Eight GPUs across two trays, TP8
Requires the multi-node configuration and interconnect setup
AMD MI355X
Eight-GPU node with AMD-specific configuration
Use the ROCm/AITER path; do not reuse NVIDIA environment settings
Single 24–32 GB consumer GPU
Insufficient for direct full-checkpoint loading
Not a practical target for this tutorial
For scale only, 2.8T parameters would occupy approximately 5.6 TB at BF16, 2.8 TB at eight bits, or 1.4 TB at an idealized four bits. These are raw parameter-storage calculations, not actual checkpoint sizes or runtime VRAM minima. Mixed precision and metadata change the file size; cache and runtime allocations increase the serving requirement.
Reserve NVMe capacity for the complete download, temporary files, and a rollback copy. On multi-node systems, validate communication before loading the model.
How to Deploy Kimi K3.1 Pro
Use self-hosting if you have suitable hardware; otherwise, begin with a hosted API. The steps below use vLLM, with SGLang as an alternative at the end of this section. Compare hosting costs after you have a working request.
Run the setup, download, launch, and initial verification commands in a Bash shell on the GPU server. If you are working from a laptop, connect to that server with SSH first. The Python client can later run on either machine using the connection instructions below.
This walkthrough follows the official deployment recipe; it has not been independently tested for this article.
1. Check GPU visibility, storage, and connectivity
Start with basic infrastructure checks:
nvidia-smi
nvidia-smi topo -m
df -h
Confirm that all target GPUs are visible and that the model directory has sufficient space. Budget additional storage for download caches, logs, and future checkpoint versions.
For multi-node deployments, verify communication between nodes before attempting model startup.
Keep the first milestone narrow: load the checkpoint and complete one short text request. This makes failures easier to diagnose.
2. Prepare the serving environment
Use a Linux host with eight B300 GPUs for this single-node example. In a CUDA environment compatible with the published recipe, create an isolated environment and install the serving tools:
The version floor does not guarantee compatibility with every driver or wheel. If the hardware recipe requires a dedicated container or build, use that environment instead. Pin the successfully tested version before production.
3. Download the complete checkpoint
Install the Hugging Face CLI and download the model repository:
Keep the configuration, tokenizer, processor files, and weight index alongside the weight shards. Copying only selected tensor files can leave the deployment incomplete.
For reproducible production deployments, record and pin the repository revision you validated. Review the repository’s custom license before commercial use.
After preparing the environment, use the following baseline command. It starts eight-way tensor parallelism and limits the initial context window to 32,768 tokens:
The kimi-local name is an application-facing alias. Use the same name in subsequent requests.
The 32,768-token setting is a conservative starting point for this walkthrough, not the model’s maximum supported context.
The --trust-remote-code option permits custom repository code to load. Pair it with a reviewed, pinned checkpoint revision.
Here, 127.0.0.1 refers to the machine running the client. The curl checks below run on the GPU server, where they reach its inference process. To use the Python client from your laptop, open an SSH tunnel in a separate laptop terminal and keep it running:
ssh -N -L 8000:127.0.0.1:8000 user@gpu-server
Replace user@gpu-server with your SSH login and server address. With this tunnel open, the laptop client can use http://127.0.0.1:8000/v1. If port 8000 is already occupied on the laptop, choose a different local port and update the client URL.
A finish_reason indicating whether generation completed or hit its limit.
GPU memory or unsupported-operation errors.
Reasoning may consume part of the generation budget. If the request reaches its limit before producing a final answer, increase the budget and retry before concluding that the server is broken.
6. Connect a local Python application
python -m pip install openai
from openai import OpenAI

client = OpenAI(
    base_url="http://127.0.0.1:8000/v1",
    api_key="EMPTY",
    timeout=300.0,
    max_retries=1,
)
response = client.chat.completions.create(
    model="kimi-local",
    messages=[{"role": "user", "content": "Write a Python function that removes duplicate filenames while preserving order."}],
    reasoning_effort="low",
    max_tokens=2048,
)
print(response.choices[0].message.content)
print(response.choices[0].finish_reason)
EMPTY is a placeholder for this loopback-only server without API-key authentication. Use your configured credential for an authenticated endpoint. Validate image input and tool execution separately before connecting an agent.
SGLang alternative
For SGLang, use the official hardware-specific cookbook. Select B300, Unified, and Low-Latency (TP8) for the closest match to this single-node walkthrough. Check the displayed verification status; a generated configuration is not necessarily a tested configuration.
On the GPU server, install Docker and configure NVIDIA Container Toolkit, then create a container with the downloaded checkpoint mounted at /models/Kimi-K3.1-Pro. Stop vLLM first so that both engines do not compete for the same GPUs.
Inside the container, paste the complete launch command produced by the cookbook for your selected configuration. Replace its model path with /models/Kimi-K3.1-Pro, set its service host to 0.0.0.0 and port to 30000, and preserve the hardware-specific flags. The container must listen on its network interface for Docker port forwarding to work; the host-side port above remains bound to loopback. Wait for the service-ready message before testing.
In a second shell on the GPU server, list the served model, then submit a request using the exact model ID returned:
curl http://127.0.0.1:30000/v1/models

MODEL_ID="replace-with-id-from-models-response"
curl http://127.0.0.1:30000/v1/chat/completions \
  -H "Content-Type: application/json" \
  -d "{\"model\":\"$MODEL_ID\",\"messages\":[{\"role\":\"user\",\"content\":\"Explain database indexes in three sentences.\"}],\"reasoning_effort\":\"low\",\"max_tokens\":2048}"
A successful response should contain a final answer. If startup fails, inspect the container logs and confirm the selected hardware recipe and image match. For laptop access, use the same SSH-tunnel pattern with port 30000. See the SGLang Docker installation guide for the container prerequisites.
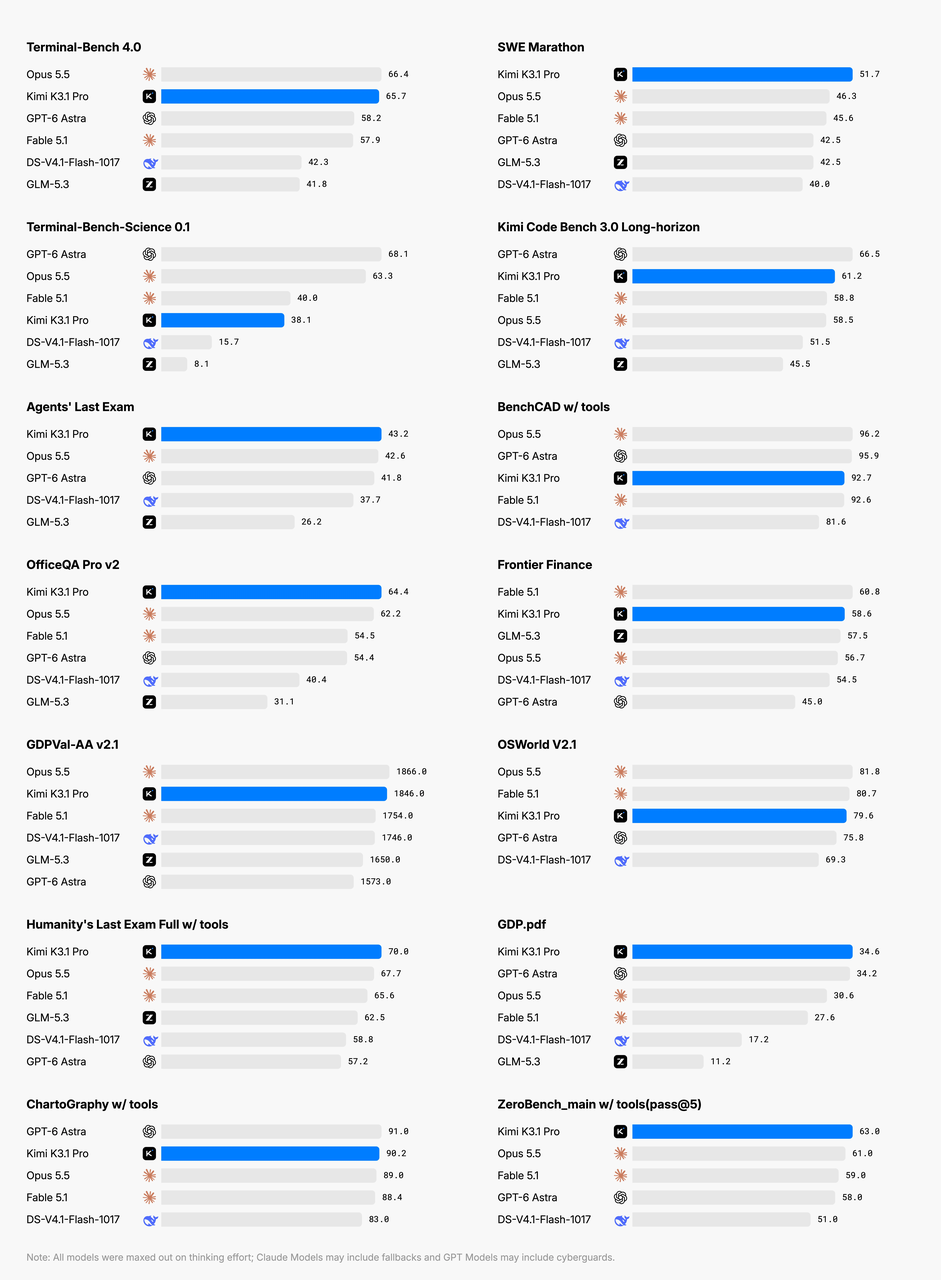
How Does Kimi K3.1 Pro Perform Across Benchmarks?
Use the official evaluation results below to choose tasks for your deployment test. These scores describe the published evaluation setup; they do not measure the local server configured in this guide.
The following table shows selected results and their positions within the comparison set published in the model card.
Benchmark and official results
Model score
Position within that comparison
Terminal-Bench 4.0
65.7
Second
SWE Marathon v1.1
51.7
First
Program Bench
31.5
Fourth
OfficeQA Pro v2
64.4
First among reported results
Frontier Finance
58.6
Second
The results support testing the model for extended engineering tasks and document workflows. Kimi K3.1 Pro leads this comparison on SWE Marathon but ranks fourth on ProgramBench, making both useful candidates for application-specific testing.
These positions are calculated within the official comparison table, not a live global leaderboard. Evaluation harnesses, tools, reasoning budgets, and sample selection differ between benchmarks.
For a deployment decision, build a small evaluation set from actual work: repository fixes, cross-document questions, and multi-step tool tasks. Measure completion quality, human corrections, and elapsed time. Published scores are useful for shortlisting; application tests determine whether the deployment is worthwhile.
How Can You Optimize Kimi K3.1 Pro Local Inference?
Control context and concurrency
Once short requests work, test longer documents, images, multi-turn conversations, and tool calls separately.
Track first-token latency, output tokens per second, and peak GPU memory at your intended context length and concurrency. Also record task success and cost per successful task, so that faster output does not hide more retries or human corrections.
Change one major variable at a time. Increasing context length, concurrency, and optimization settings simultaneously makes performance regressions difficult to explain.
Choose reasoning effort and cache settings deliberately
Use low, high, or max reasoning effort according to the task. Start with low for interface checks, then compare high and max on difficult tasks using both completion quality and elapsed time. A longer reasoning trace is not itself evidence of a better result.
For long sessions, evaluate cache capacity and prefix reuse before adding speculative decoding or more concurrency. Keep a known-good baseline and change one setting at a time.
Why Can Kimi K3.1 Pro Tool Calling Fail After Deployment?
Your application executes tool calls, returns their results, and continues the conversation. Preserve the complete assistant message—including reasoning_content and tool_calls—and return each tool result with its matching tool_call_id.
Multi-turn handling also matters. The model’s usage guidance requires preserving the complete assistant message, including reasoning and tool-call fields, rather than retaining only the final text.
Symptom
First checks
Unrecognized model architecture
Runtime version, custom code, and configuration
Out of memory while loading
GPU capacity, parallelism, and competing processes
Short requests work but long requests fail
Context limit, cache capacity, and concurrency
Tool calls cannot be parsed
Parser settings and tool schema
The agent stops after requesting a tool
Application execution and tool-result handling
Multi-turn answers become inconsistent
Missing assistant-message fields
Use a minimal reproducible request to isolate each failure. Once it works, reintroduce the application’s additional settings one at a time.
Should You Self-Host or Use a Hosted API?
Choose self-hosting when you need control over weights, infrastructure, or data location and can keep the GPUs usefully occupied. For initial evaluation or variable demand, compare the official Kimi API and CometAPI using the same prompts and acceptance criteria. Confirm each service’s model access, supported parameters, quotas, and data-handling terms.
Cost or operating factor
Self-hosted
Official Kimi API / CometAPI
Capacity cost
GPU purchase or rental, including idle time
Billed API usage; check each provider’s current rates
Storage and networking
Checkpoint storage, cache, and network charges
Any application-side storage and network charges
Operations
Deployment, monitoring, upgrades, and recovery
Integration, quota management, and request monitoring
Retries
Include their GPU time in compute costs
Include their tokens or calls in API charges
Human review
Count correction time using the same rate
Count correction time using the same rate
Best fit
Steady demand and infrastructure control
Evaluation and variable demand
A useful comparison is:
Cost per successful task = (GPU compute or API charges + storage and networking + operations + human correction) / successfully completed tasks.
Use costs and successful-task counts from the same measurement period. Include failed attempts and retries in the compute or API total once; do not add a second retry charge. For a hybrid workflow, include both compute and API charges. Count unique completed tasks, not request attempts.
An underused server can remain expensive even when its theoretical throughput is excellent. Conversely, a team with existing infrastructure, steady demand, and strict data requirements may gain substantial value from self-hosting.
Use identical prompts and acceptance criteria when comparing deployment routes. Include end-to-end latency and output quality in the decision.
Try the hosted endpoint without loading weights
The official Kimi API quickstart uses the endpoint below. Set MOONSHOT_API_KEY in your environment and confirm model access in your account. This request runs on the provider’s infrastructure.
import os
from openai import OpenAI

client = OpenAI(
    api_key=os.environ["MOONSHOT_API_KEY"],
    base_url="https://api.moonshot.ai/v1",
)
response = client.chat.completions.create(
    model="kimi-k3.1-pro",
    messages=[{"role": "user", "content": "Explain database indexes in three sentences."}],
    reasoning_effort="low",
    max_completion_tokens=2048,
)
print(response.choices[0].message.content)
For Kimi K3.1 Pro API in CometAPI, set COMETAPI_API_KEY in your environment and confirm that your account has access to the requested model. The request runs remotely:
import os
from openai import OpenAI

client = OpenAI(
    api_key=os.environ["COMETAPI_API_KEY"],
    base_url="https://api.cometapi.com/v1",
)
response = client.chat.completions.create(
    model="kimi-k3.1-pro",
    messages=[{"role": "user", "content": "Explain database indexes in three sentences."}],
    max_tokens=2048,
)
print(response.choices[0].message.content)
Compare the result with your local endpoint using the same acceptance criteria. Check the current route price and supported parameters before estimating production costs.
Conclusion
Self-hosting Kimi K3.1 Pro is practical with a supported GPU configuration and the matching inference environment. Use the deployment steps above to establish a working endpoint, then measure task quality, latency, and cost on your own workload. Choose a hosted API if you are still validating the application or do not have suitable hardware.
FAQ
Can a regular laptop run the complete model?
A regular laptop is not a practical target for the original checkpoint’s capacity requirements. It can act as a client connected to your own inference server or a hosted API.
Does installing the desktop application count as local deployment?
The installation location of the application does not establish where inference happens. Self-hosting requires the model weights and inference process to run in infrastructure you control.
Why does the model need so much memory if only 104B parameters are active?
Different tokens can select different experts. Active parameters describe participation in computation; the deployment still needs to store and access the full set of weights.
Can I immediately enable the full million-token context?
Increase context length gradually and measure GPU memory use at your target concurrency. The model supports 1,048,576 tokens, but the usable serving capacity depends on your cache and parallelism settings.
Will the local deployment reproduce published benchmark scores?
Not automatically. Quantization, reasoning budgets, tools, prompts, and evaluation frameworks can all affect results. Validate the configuration against your own tasks.
Should I test through an API before buying hardware?
If you have not established that the model meets your quality requirements, API testing provides an initial baseline with less infrastructure work. Teams with suitable hardware and clear data-residency requirements can proceed directly to a controlled self-hosting evaluation.