Google Gemini CLI Tutorial: How to Install and Use It via CometAPI
Gemini CLI is Google’s open‑source command‑line AI agent that brings the power of Gemini 2.5 Pro directly into your terminal. Launched on June 25, 2025, it offers developers free access to advanced AI capabilities—code generation, content creation, task automation, and more—via natural‑language prompts. With generous usage limits (60 model requests/minute, 1,000/day) under a free Gemini Code Assist license, and support for Windows, macOS, and Linux, Gemini CLI transforms the terminal into an AI‑driven workspace.
What is the Gemini CLI?
The Gemini CLI is an open‑source command‑line interface released by Google that brings the power of the Gemini 2.5 Pro model directly into developers’ terminals. Launched in preview on June 25, 2025, it enables AI‑driven workflows—ranging from code generation and debugging to content creation and multimodal requests—without leaving the shell. By exposing natural‑language prompts, function calling, and integrated tools like Google Search and the Model Context Protocol (MCP), Gemini CLI transforms the terminal into an AI‑first workspace, reducing context switching and streamlining development pipelines .
What core features does Gemini CLI offer?
- Natural‑language prompting: Issue simple text prompts (e.g.,
gemini run "Generate a REST API in Go.") to receive code, summaries, or research insights. - Function calling and tool use: Leverage Google Search, code execution tools, or custom functions within prompts to fetch real‑time data or perform complex tasks.
- Multimodal support: Invoke Veo and Imagen models inline to request image or video generation directly from the CLI .
- Large context windows: Up to 10,000 tokens for processing extensive codebases or long documents.
These capabilities position Gemini CLI as a strategic tool for developers seeking an AI‑driven terminal experience without the overhead of managing cloud console logins or SDK installations.
How does CometAPI enhance the Gemini CLI experience?
CometAPI is a unified REST interface that aggregates hundreds of AI models—Google Gemini, OpenAI’s GPT series, Anthropic’s Claude, and more—under a single endpoint with built‑in API‑key management, usage quotas, and billing dashboards ([CometAPI][5]). By integrating the Gemini CLI with CometAPI, developers gain vendor‑agnostic access to Gemini models without juggling multiple credentials or endpoints.
The main advantages of using CometAPI with Gemini CLI are:
- Simplified endpoint management: Instead of pointing the CLI at Google’s default API URLs, you configure it to use CometAPI’s base URL via an environment variable, centralizing all AI traffic through one interface.
- Unified billing and quotas: CometAPI offers competitive pricing—often lower than official Google rates—and provides a consolidated dashboard to track usage across Gemini, Claude, GPT, and more, eliminating billing silos .
- Seamless model switching: With CometAPI, swapping between different model providers is as easy as changing a model parameter in your requests, empowering rapid experimentation and cost control .
By leveraging CometAPI, teams can remain agile, vendor‑agnostic, and cost‑effective, all while retaining the full power of Gemini CLI in their terminals.
How can I install the Gemini CLI?
Prerequisites
Before installing, ensure your system meets the following requirements:
- a supported OS (Windows 10/11, macOS 10.15+, Ubuntu 20.04+, or Debian 10+)
- Node.js v20 or higher (or v18+ for basic functionality).
- npm (Node Package Manager) installed alongside Node.js.
- A terminal environment on Linux, macOS, or Windows (PowerShell, WSL, or native Bash).
Verify your Node.js version:
node -vIf this returns a version below 18, upgrade via your package manager (e.g., sudo apt install nodejs npm on Ubuntu) .
Installation methods
You have 3 primary options to install the Gemini CLI:
- Global install via npm
npm install -g @google/gemini-cliThis global install makes the gemini command available system‑wide. However, global installs can introduce version conflicts and require elevated permissions.
- One‑off execution via npx
npx https://github.com/google-gemini/gemini-cliThis runs the CLI without permanently installing it, ideal for quick trials or ephemeral environments .
Once installed, verify it by running:
gemini --versionHow do I authenticate Gemini CLI with CometAPI?
Authentication ensures your CLI sessions are securely tied to your CometAPI account, enabling unified billing and quota management across models. CometAPI aggregates Google Gemini alongside dozens of other providers, meaning a single API key unlocks multiple AI backends.
How do I obtain a CometAPI key?
- Sign up or log in at cometapi.com and navigate to the “API Tokens” section in your dashboard.
- Generate a new token by clicking “Add Token.” Copy the resulting key (e.g.,
sk-xxxxxxxxxxxx) and store it in a secure vault .
How do I link the key to Gemini CLI?
After installation, invoke:
gemini loginThis command directs you to Google’s OAuth flow in your browser.
To use Gemini CLI with https://api.cometapi.com, you will need two key pieces of information:
API Key (GEMINI_API_KEY)This is your personal access key obtained after registering on the api.cometapi.com platform (it usually starts with sk-).
API Endpoint (GOOGLE_GEMINI_BASE_URL)This is our API service endpoint address, which is fixed at https://api.cometapi.com.
# Navigate to your project folder
cd your-project-folder

# Set environment variables (replace YOUR_API_KEY with your actual key) export GEMINI_API_KEY=YOUR_API_KEY export GOOGLE_GEMINI_BASE_URL="https://api.cometapi.com"
- The CLI opens a browser window prompting you to paste your CometAPI token.
- After successful authentication, a local config file (
~/.gemini/config.json) stores your credentials, and all subsequentgemini runcommands route through CometAPI’s unified gateway endpoint (https://api.cometapi.com) .
How do I run the Gemini CLI via CometAPI?
Initial launch and theme selection
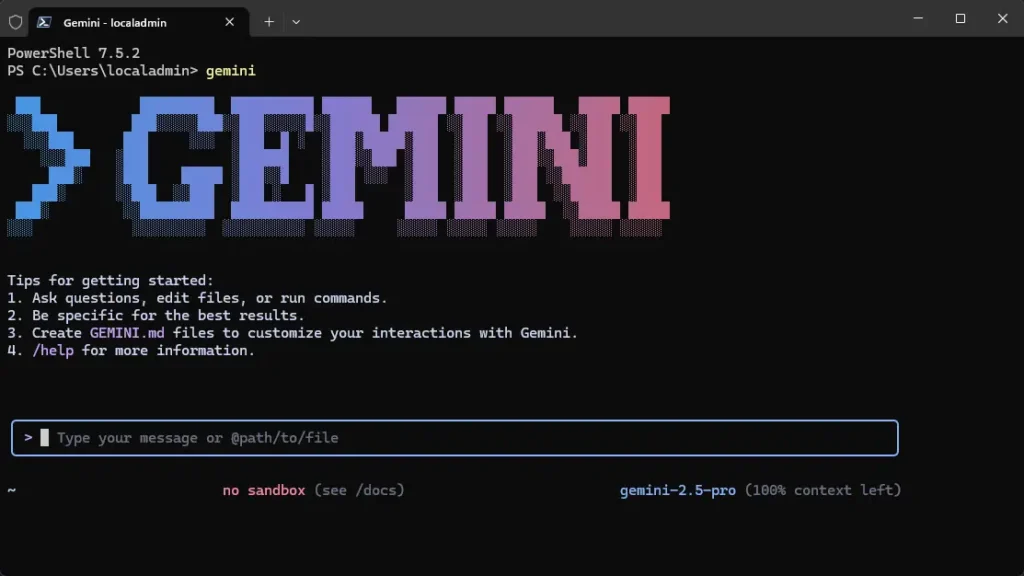
After configuration, launch the CLI by simply typing:
geminiOn first run, Gemini CLI prompts you to pick a color theme (Default, Dark, Solarized, etc.) for the interactive session. This step only occurs once per installation.
Authentication flow
If GEMINI_KEY and GEMINI_BASE_URL are set, the CLI will authenticate automatically via the header, bypassing interactive login.
Successful authentication is confirmed with a “Logged in as …” message, along with your current usage quotas.
Verifying connectivity
Test your setup by issuing a simple prompt:
gemini "Explain the difference between REST and GraphQL"You should receive an AI‑generated response pulled through CometAPI’s gateway, demonstrating that both the endpoint override and key handling are correctly configured.
How Can I Integrate Gemini CLI into My Development Workflow?
What Are Common Use Cases?
- Code Generation & Refactoring: Quickly scaffold projects, refactor functions, or generate unit tests.
- Error Explanation: Paste an error stack trace and ask the AI to diagnose.
- Documentation & Comments: Auto‑generate docstrings or markdown README sections.
- Shell Automation: Convert natural‑language tasks into shell commands (e.g., “compress this folder into a tar.gz and upload to S3”).
Can I Script Gemini CLI in CI/CD?
Absolutely. Since Gemini CLI returns JSON or plain text outputs, you can script prompts in shell scripts:
gemini --non-interactive "Optimize this Dockerfile for production" > optimized.DockerfileThis enables AI‑driven optimizations as part of your build pipeline .
How Does Model Context Protocol (MCP) Work?
MCP allows Gemini CLI to fetch real‑time web data. For example, to query live sports scores or stock prices, use:
gemini --mcp "What’s the current stock price of GOOGL?"This hybrid approach combines language reasoning with external data sources .
Can I Switch Models on the Fly?
Yes—use the --model flag to choose between gemini-2.5-pro, gemini-2.0-base, or any future variants. This flexibility lets you optimize for speed, cost, or context size:
gemini --model gemini-2.0-base "Summarize this file."Best practices and tips for using Gemini CLI via CometAPI
1. Run the following commands.
They will automatically append the configuration to ~/.bash_profile, ~/.bashrc (for Bash), and ~/.zshrc (for Zsh).
# Write your API Key to the config files (replace YOUR_API_KEY with your actual key)
echo -e '\nexport GEMINI_API_KEY="YOUR_API_KEY"' >> ~/.bash_profile
echo -e '\nexport GOOGLE_GEMINI_BASE_URL="https://api.cometapi.com"' >> ~/.bash_profile

echo -e '\nexport GEMINI_API_KEY="YOUR_API_KEY"' >> ~/.bashrc
echo -e '\nexport GOOGLE_GEMINI_BASE_URL="https://api.cometapi.com"' >> ~/.bashrc

echo -e '\nexport GEMINI_API_KEY="YOUR_API_KEY"' >> ~/.zshrc
echo -e '\nexport GOOGLE_GEMINI_BASE_URL="https://api.cometapi.com"' >> ~/.zshrc
2. Use After Restarting Terminal
You must completely close and reopen your terminal for the changes to take effect. Afterwards, you can simply navigate to your project directory and run gemini.
cd your-project-folder
gemini
3.What If Authentication Fails?
OAuth tokens can expire or become corrupted. Re‑run:
gemini logout && gemini login4. What about latency and performance?
- Choose the right model: For lightweight chat or summarization tasks, prefer
gemini-2.5-flash-lite-preview-06-17for sub‑200 ms responses at lower cost . - Batch requests: When processing large datasets, aggregate prompts into fewer, larger calls to reduce HTTP overhead and per‑request latency.
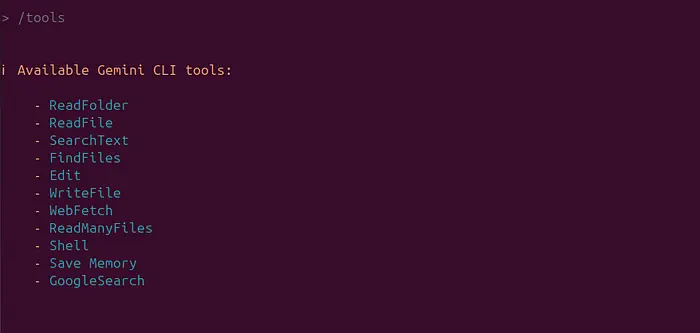
5.Gemini CLI has some handy built-in tools.
You can use commands like:
Getting Started
CometAPI is a unified API platform that aggregates over 500 AI models from leading providers—such as OpenAI’s GPT series, Google’s Gemini, Anthropic’s Claude, Midjourney, Suno, and more—into a single, developer-friendly interface. By offering consistent authentication, request formatting, and response handling, CometAPI dramatically simplifies the integration of AI capabilities into your applications. Whether you’re building chatbots, image generators, music composers, or data‐driven analytics pipelines, CometAPI lets you iterate faster, control costs, and remain vendor-agnostic—all while tapping into the latest breakthroughs across the AI ecosystem.
CometAPI has supported gemini cli,details refer to doc.Supercharge your terminal with Google’s Gemini CLI on CometAPI!You can analyze massive codebases with a 1M+ token context and Turn ideas, diagrams, and even PDFs into code.Integrate in minutes and start building smarter.
Developers can access Gemini-2.5 Pro Preview API and Gemini-2.5 Flash Pre API through CometAPI, the latest models listed are as of the article’s publication date. To begin, explore the model’s capabilities in the Playground for detailed instructions. Before accessing, please make sure you have logged in to CometAPI and obtained the API key. CometAPI offer a price far lower than the official price to help you integrate.
Conclusion
By combining Google’s cutting‑edge Gemini CLI with CometAPI’s unified, cost‑efficient API gateway, developers unlock a seamless, vendor‑agnostic, and secure AI‑powered terminal environment. You benefit from Gemini’s advanced models, generous free tiers, and open‑source flexibility, while CometAPI simplifies endpoint management, billing, and model switching. Whether you’re writing code, analyzing data, or automating DevOps tasks, this integration redefines what’s possible in your terminal—empowering you to iterate faster, control costs, and stay at the forefront of AI innovation.