

You can plug CometAPI — a single API gateway that exposes hundreds of models — into Continue (the open-source, IDE-integrated AI code agent) so your VS Code Continue extension talks to CometAPI’s models. This article explains what each product is, why you’d combine them, the environment and prerequisites, an exact step-by-step integration recipe (including the exact UI steps you asked for), configuration samples, recommended best practices, troubleshooting tips, and concrete use cases.
What is Continue?
Continue is an open-source “continuous AI” code assistant that runs inside developer tooling (VS Code, JetBrains, and a CLI). It aims to turn LLMs into reusable code agents that can edit files, answer contextual questions about your repository, run “shortcuts” and automate repetitive development tasks. Continue is distributed as an extension and a CLI, and it is explicitly model-agnostic — you can configure different LLM providers and models for features such as chat, code editing, autocomplete, and embeddings. The project, docs and the VS Code extension are maintained publicly.
Practical points:
- Continue runs locally in your IDE and calls external model providers over HTTP.
- Because it’s open source, you can customize models, provider definitions, and the YAML configuration it uses for model capabilities.
How does Continue expose AI models?
Continue lets you register model providers and choose the specific model to power a given agent. Agents can be run inside the IDE (via the VS Code extension), via the CLI, or as part of CI. Configuration can be done through the Continue UI inside VS Code, or by editing Continue’s configuration files (e.g., ~/.continue/config.json or ~/.continue/config.yaml) for headless environments.
What is CometAPI? (Who are they and what do they provide?)
CometAPI is a model-aggregation API: a single unified API that gives developers access to dozens or hundreds of LLMs, image/video models and multimodal offerings from many vendors (OpenAI, Anthropic, Llama/GPT-style models, and others) via one integration. CometAPI advertises a broad catalog (their marketing pages reference “500+ models”), an OpenAI-compatible developer experience in many scenarios, and quick-start guides for plugging CometAPI into third-party apps. CometAPI issues short API keys that often appear with an sk- prefix for use in apps.
Why that matters:
- Instead of integrating each model vendor separately, CometAPI lets you switch model backends and experiment quickly without changing client-side code.
- CometAPI provides docs and sample integrations for other tools (Flowise, LobeChat, etc.), showing a focus on being a provider target for third-party UIs and agents.
What are the typical capabilities of CometAPI?
CometAPI supports text completion, chat, image and video generation (depending on the underlying model), and other inference primitives. It issues API keys of the form sk-xxxxx and exposes an optional baseurl for custom endpoints. The platform offers developer documentation, a console for token management, and integration examples.
Why integrate Continue with CometAPI?
Integrating Continue with CometAPI gives you the flexibility to:
- Access many models from one place (fast model switching for evaluation or cost/performance experiments).
- Avoid vendor lock-in while retaining the convenience of a single API key in your local dev environment.
- Run specialized workflows: use one model for chat, another for code autocomplete, and a third for embeddings — all configured inside Continue.
- Simplify team setups: centralize billing and quota management at CometAPI while enabling developers to use Continue’s UX in VS Code.
In short: Continue gives you the local agent/IDE UX; CometAPI gives you the model variety and a single integration surface.
Main advantages:
- Model plurality & agility. Use CometAPI to switch between dozens or hundreds of models (cloud and hosted) without changing your agent code. This lets you A/B models for cost, latency, or capability.
- Single integration point. Continue can treat CometAPI as just another provider; you configure CometAPI once and then select provider/model inside Continue. That reduces configuration complexity and lets teams standardize on a single management surface.
- Cost & governance controls. CometAPI’s multi-model marketplace can help optimize costs by routing cheap requests to efficient models while reserving powerful (and more expensive) models for complex tasks. Continue’s agent governance features let you enforce rules about which models are allowed in which contexts.
- Faster experimentation. Swap models on the fly to compare outputs for prompts, refactors, or CI checks without changing agent definitions. This is especially valuable when tuning agents for code generation, test creation, or refactoring tasks.
What environment and conditions do you need to prepare?
Before you start, prepare the following:
Minimum software & accounts
- VS Code (latest stable release). Continue provides a VS Code extension.
- Continue extension installed in VS Code (search “Continue” in Extensions or use the extension page).
- CometAPI account with an API key (you’ll receive an
sk-xxxxxstyle key in the CometAPI dashboard).
Network & security
- Outbound HTTPS access from your machine to CometAPI’s endpoints (e.g.
https://api.cometapi.com/v1or other base URL specified by CometAPI). Firewalls and corporate proxies may require configuration. - Secure storage of keys — use OS keychains or environment variables rather than committing keys to your repo. Treat
sk-...keys like secrets.
Versions & compatibility
- Ensure your Continue extension version supports custom model providers — modern Continue releases provide a Model Providers UI and YAML-based customization for models. If you run into a missing feature, upgrade Continue or consult the repo for sample configs.
Optional but recommended
- A small test repo for verifying prompts and edits without affecting production code.
- Understanding of model roles (chat, embed, autocomplete) — Continue maps models to roles in config.
How do you integrate Continue with CometAPI?
Below is a step-by-step recipe that follows the exact UI workflow you specified — with added YAML and validation tips.
Step 1 — Install Continue in VS Code
- Open VS Code → Extensions → search for Continue and click Install, or run the Quick Open command:
ext install Continue.continue. The extension has widespread adoption and a published Marketplace listing.
Step 2 — Create / obtain your CometAPI key
Sign up / log in at CometAPI (cometapi.com) and create an API key (often shown as sk-xxxxx). Copy it to clipboard.
Step 3 — Open Continue settings in VS Code
- In VS Code, open the command palette (
Ctrl/Cmd+P) and type Continue: Open Settings (or find Continue → Settings in the extension pane). - Navigate to the Models area inside Continue’s settings / model provider configuration panel. Continue supports adding custom providers from the settings UI.
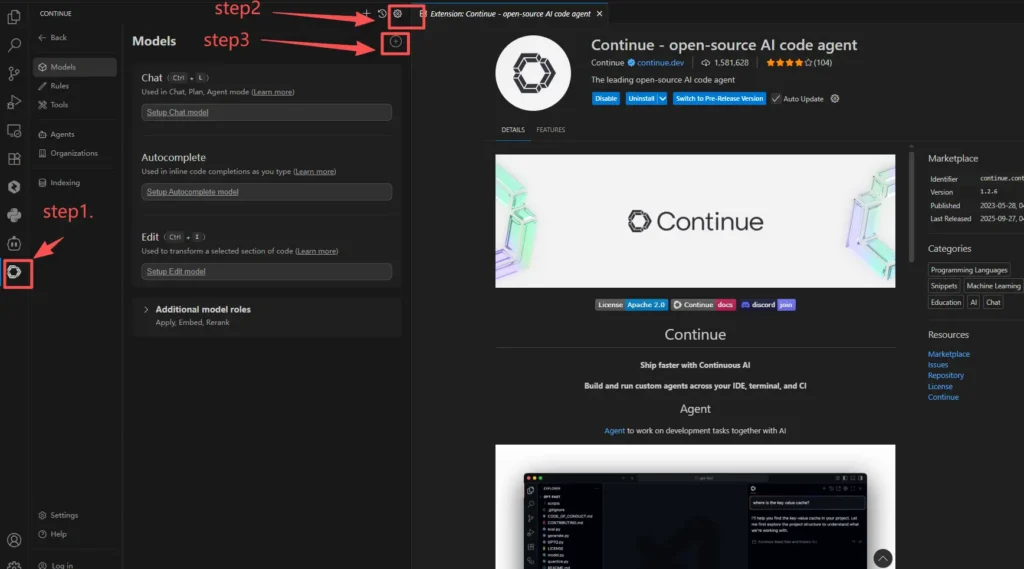
Step 4 — Add CometAPI as a provider (UI flow)
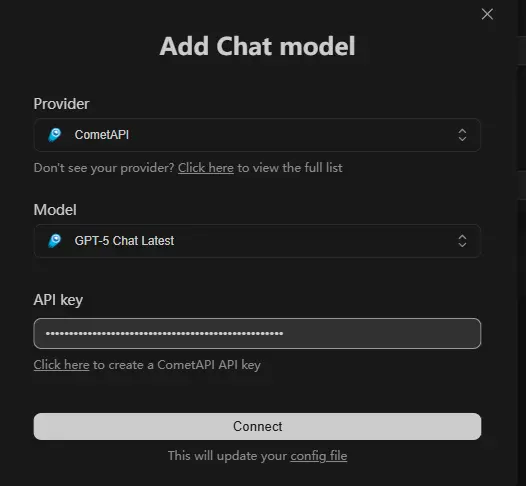
1.Click the + (Add) button in the Models section.
- In the Provider search box, type cometapi (or the provider identifier you choose). If CometAPI isn’t prepopulated, you can either:
- Choose a generic OpenAI-compatible provider option (if Continue provides one) and set the base URL to CometAPI’s base URL; or
- Add a custom provider entry (many Continue users do this using a small JSON/YAML provider entry).
- When prompted for an API key, paste your CometAPI key (
sk-xxxxx) into the API key input box and click Save. This matches the exact UI steps you requested: “Enter continue settings menu, select models, click +, and search cometapi as provider. Paste the sk-xxxxx from cometapi in the API key input box and click ‘Save’.”

Step 5 — Manually define the model (if needed)
- After saving the provider, Continue lets you select or manually fill in a model field (for example:
gpt-4o-mini,claude-2,gpt-5-xxx, or any identifier CometAPI exposes). Fill this according to the model you want to use for a given role (chat, edit, autocomplete, embed). Continue supports model roles in its YAML reference.
Example: sample model config (YAML)
If you prefer to configure Continue with a YAML file rather than the UI, a minimal snippet that mirrors Continue’s config structure looks like this (adapt to your Continue version):
# .continue/models.yml

models:
- id: comet-chat
    title: "CometAPI • Claude Sonnet"
    provider: "cometapi"        # provider identifier you created

    model: "claude-sonnet-4"    # model label as exposed by CometAPI

    role: "chat"
    systemMessage: "You are a helpful code assistant."
    apiKeyEnv: "CONTINUE_COMETAPI_KEY"
Save the API key securely to your OS environment or Continue’s secret store:
# mac / linux example

export CONTINUE_COMETAPI_KEY="sk-xxxxxxxx"
Step 6 — Test a quick prompt
- Open a code file.
- Invoke Continue’s chat/autocomplete command and choose the new CometAPI model.
- Ask a simple question (e.g., “Explain this function” or “Create unit tests for this file”). Verify that the request succeeds and the model responds.
If the request fails, check the developer console in VS Code and the network logs to see if the call reached api.cometapi.com or if there’s an authorization error (401/403) — common causes are invalid API key or an incorrect base URL.
Use Plan Mode or read-only modes when you want agents to analyze code but not modify files automatically (Continue introduced Plan Mode to reduce risk).
What are recommended use cases?
- Project-aware code editing — Use a high-quality chat model for code explanation and a cheaper code-completion model for real-time suggestions. Continue’s model roles make this straightforward.
- Automated refactors & migrations — Create Continue shortcuts (agent tasks) that invoke different models for planning, patch generation, and validation. The ability to easily switch models via CometAPI lets you A/B test quality vs cost.
- Embeddings + semantic search — Generate embeddings with one model and run semantic search for large repos to surface relevant code snippets or docs.
- Rapid multi-model experimentation — Evaluate experimental models from CometAPI’s catalog (e.g., new research offerings) inside Continue with minimal config changes.
- Fast prototyping: Swap to an image-generation model via CometAPI for README screenshot generation or design mocks while coding.
Concrete example: PR autopilot
- When a pull request is opened, Continue triggers an agent that: (a) runs static checks, (b) generates and runs unit tests, (c) suggests a short summary for the PR description.
- The agent uses a cheap model for step (a), a mid-tier model for (b), and a larger model for the final PR summary — all selected dynamically through CometAPI.
Getting Started
CometAPI is a unified API platform that aggregates over 500 AI models from leading providers—such as OpenAI’s GPT series, Google’s Gemini, Anthropic’s Claude, Midjourney, Suno, and more—into a single, developer-friendly interface. By offering consistent authentication, request formatting, and response handling, CometAPI dramatically simplifies the integration of AI capabilities into your applications. Whether you’re building chatbots, image generators, music composers, or data‐driven analytics pipelines, CometAPI lets you iterate faster, control costs, and remain vendor-agnostic—all while tapping into the latest breakthroughs across the AI ecosystem.
To begin, explore the model’s capabilities in the Playground and consult the Continue API guide for detailed instructions. Before accessing, please make sure you have logged in to CometAPI and obtained the API key. CometAPI offer a price far lower than the official price to help you integrate.
Ready to Go?→ Sign up for CometAPI today !
Summary: why this integration is a strong option today
Integrating Continue with CometAPI gives engineering teams a flexible, governed, and cost-efficient way to run agentic AI across IDE, CLI, and CI. Continue supplies the agent orchestration and local tool integration; CometAPI supplies a single, switchable gateway to hundreds of models — which accelerates experimentation, simplifies ops, and reduces vendor lock-in. The integration is straightforward: install Continue in VS Code or CLI, create a CometAPI token, add CometAPI as a provider in Continue’s models/settings, and test with a simple agent. Use secret management, pin models for reproducibility, and route workloads by cost/latency needs.