

AI is moving fast: new multimodal models and improved realtime APIs are making it easier to embed powerful AI into automation platforms, while parallel debates about safety and observability are reshaping how teams run production systems. For people building local automations, a practical pattern is emerging: use a unified model gateway (like CometAPI) to access many models, and stitch those model calls into a self-hosted automation runner (like n8n) so you keep control of data, latency, and costs. This guide shows you, step-by-step, how to get started with CometAPI + n8n (local), what to watch for, and how to troubleshoot when things go sideways.
What is n8n and why does it matter for AI automation?
n8n is an open-source workflow automation tool with a visual editor and a large ecosystem of nodes (connectors). It’s designed to let you chain triggers, transforms, and external API calls into repeatable workflows (webhooks, scheduled jobs, file processing, chatbots, etc.). Self-hosting n8n locally gives you complete control over data residency and execution, which is particularly valuable when calling third-party AI models that handle sensitive inputs.
How does n8n work in practice?
- Visual canvas with triggers (Webhook, Cron) and action nodes (HTTP Request, database nodes, email).
- Community nodes extend capability — you can install community packages and treat them like native nodes.
Self-hosting n8n gives you:
- Full data control — workflows and run data stay on infrastructure you manage.
- Customization — add private nodes or local integrations without waiting for cloud features.
- Cost predictability — no per-task cloud billing surprises for heavy internal automation.
- Security & compliance — easier to meet internal policy and regulatory needs.
What is CometAPI and why use it as your model gateway?
CometAPI is a unified API gateway that exposes hundreds of third-party AI models (text, embeddings, image generation, etc.) behind a single, OpenAI-compatible interface and billing model. That means instead of adding bespoke integrations for every LLM or image engine you want to try, you call one API and pick the model you want in the request. This simplifies experimentation, cost control, and operational integration.
benefits:
- Model choice: Try many vendors/models with the same code path.
- Token pooling / free quotas: Many unified gateways offer credits/tiers to experiment.
- Simpler infra: One authentication system and one base URL to manage.
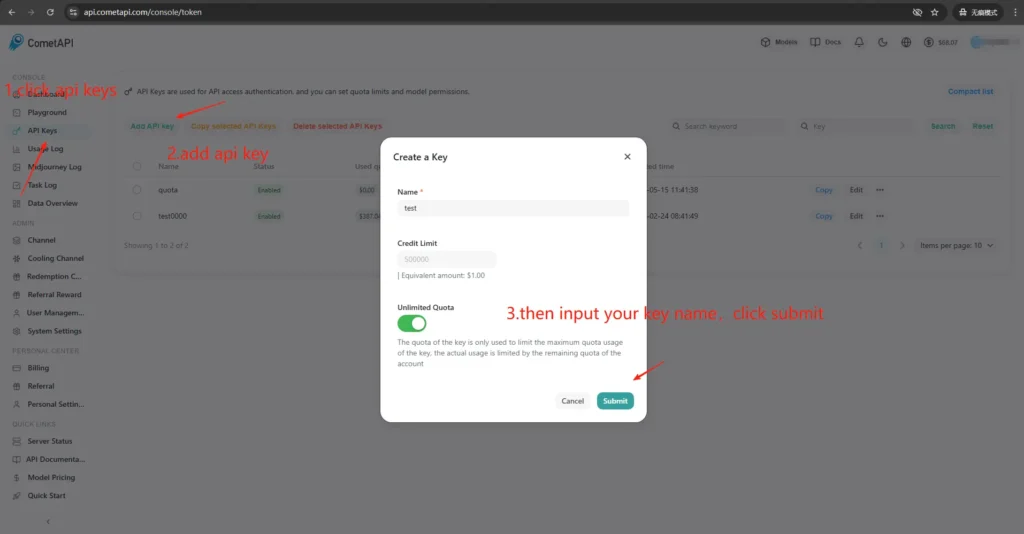
How do I obtain CometAPI access and keys?
- Sign up at the CometAPI site (or vendor dashboard). Most gateways have a free tier to test.
- Get an API key from your CometAPI dashboard — a long secret string. Note where the docs tell you to place it (CometAPI uses Bearer authorization against
https://api.cometapi.com/v1). - Read the API docs for the endpoint you plan to use (chat completions, images, embeddings). CometAPI documents endpoints like
/v1/chat/completionsand/v1/images/generations.
Why is bonding (integration) between n8n and CometAPI important?
“Bonding” here means a reliable, secure integration path between your automation runner (n8n) and your model gateway . Proper bonding matters because:
- It preserves context across calls (conversation history, embeddings).
- It centralizes credentials and secrets in one place for safer rotation.
- It reduces latency and error surface by using predictable endpoints and standard request formats.
- It enables observability and troubleshooting—knowing which model, prompt, and response led to a result.
In short: good bonding lowers operational risk and speeds iteration.
How do I deploy n8n locally (quick practical guide)?
You can run n8n locally either with npm or with Docker; Docker Compose is the recommended approach for most self-hosted scenarios (it’s reproducible and isolates dependencies). Below is a minimal Docker Compose example and essential notes.
How do I self-host n8n with Docker?
Docker (and Docker Compose) is the most robust, repeatable way to run n8n in production. It isolates the app, makes upgrades simpler, and pairs well with reverse proxies and orchestrators (Docker Swarm, Kubernetes). n8n’s official docs include a Docker Compose reference that I’ll follow and adapt here.
For production you’ll typically run a stack consisting of:
- n8n service (official image:
docker.n8n.io/n8nio/n8norn8nio/n8ndepending on tag). - PostgreSQL (or another supported DB).
- Redis (if you plan to use queue mode).
- A reverse proxy (Traefik, Caddy, or nginx) for TLS, host routing, and rate-limit rules.
This architecture cleanly separates concerns (DB persistence, queueing, web proxy) and makes scaling and backups straightforward. The official n8n docs provide Docker Compose patterns and environment variable references.
This is step-by-step guide:
- Create a folder and a
docker-compose.ymlwith the canonical n8n service. Below is a practical docker-compose example that covers typical production needs: external Postgres, Redis (for queue/executions mode), persistent volumes, and an Nginx reverse proxy handling TLS:
```yaml
version: "3.8"
services:
  n8n:
    image: n8nio/n8n:latest
    restart: unless-stopped
    environment:
- DB_TYPE=postgresdb
- DB_POSTGRESDB_HOST=postgres
- DB_POSTGRESDB_PORT=5432
- DB_POSTGRESDB_DATABASE=n8n
- DB_POSTGRESDB_USER=n8n
- DB_POSTGRESDB_PASSWORD=supersecretpassword
- N8N_BASIC_AUTH_ACTIVE=true
- N8N_BASIC_AUTH_USER=admin
- N8N_BASIC_AUTH_PASSWORD=anothersecret
- WEBHOOK_TUNNEL_URL=https://n8n.example.com
- EXECUTIONS_MODE=queue
- QUEUE_BULL_REDIS_HOST=redis
    ports:
- "5678:5678"
    volumes:
- n8n_data:/home/node/.n8n
    depends_on:
- postgres
- redis

  postgres:
    image: postgres:15
    environment:
      POSTGRES_DB: n8n
      POSTGRES_USER: n8n
      POSTGRES_PASSWORD: supersecretpassword
    volumes:
- pgdata:/var/lib/postgresql/data

  redis:
    image: redis:7
    volumes:
- redisdata:/data

volumes:
  n8n_data:
  pgdata:
  redisdata:
2. Start:
docker compose up -d
3. Visit `http://localhost:5678` and create your admin user. For production you’ll want Postgres, SSL, and proper environment variables — see the official Docker Compose documentation.

**Notes & hardening:**
- Do **not** store secrets in plaintext in `docker-compose.yml`; use environment files, Docker secrets, or external secret managers in production.
- Replace `WEBHOOK_URL` with your real public URL and configure the reverse proxy to route `n8n.example.com` to the n8n container.
- Use `EXECUTIONS_MODE=queue` for robust background processing; it requires queue workers and Redis.

## How do I self-host n8n with npm / Node.js?

Installing via npm (or pnpm) runs n8n directly on the host. This is lighter (no container layer) and may be helpful for single-user, low-complexity installs or developer machines. However, it places more responsibility on the admin for dependency management, isolation, and service supervision. The official n8n docs include an npm installation guide and caveats.

### The required OS packages and Node version:

- Use a stable LTS Node.js (Node 18 or Node 20+, match n8n release requirements).
- Install `build-essential`, `git`, and a process manager (systemd is recommended).
- For production, still use PostgreSQL and Redis as external services (same reasoning as Docker).

### How do I install and run n8n via npm (step-by-step)?

1.Install Node.js (recommended: nvm)
Install nvm
curl -o- https://raw.githubusercontent.com/nvm-sh/nvm/v0.39.7/install.sh | bash
Reload your shell (adjust to your shell startup file if needed)
source ~/.bashrc # or ~/.zshrc
Install and use the latest LTS (usually 18 or 20)
nvm install --lts
nvm use --lts
Verify
node -v
npm -v
If you see “n8n: command not found” later, restart the terminal or ensure the nvm-managed npm global bin path is on your PATH.

---

2. Install and start n8n (local)
npm install -g n8n
n8n -v # verify version
3. Start in the foreground:
n8n start
Default URL: <http://localhost:5678/> If the port is in use:
export N8N_PORT=5679
n8n start
Optional: keep it running in the background (still local):
npm install -g pm2
pm2 start "n8n" --name n8n
pm2 save
pm2 status

4 .First access and sign in:
- Open http://localhost:5678/ in your browser.
- On first run, follow the wizard to create the Owner account (email + password) and sign in.

## How do I install or configure a CometAPI community node in n8n?
n8n supports both verified community nodes (GUI install) and manual installation from npm when you self-host. There are two ways to integrate CometAPI into n8n:
### Option A — Use the CometAPI community node (if available in Nodes panel)
1. In n8n open the nodes panel (press `+` or `Tab`).
2. CometAPI is a verified community node, it appear under “More from the community.” Click and install.
3. After installation, restart n8n if prompted. Create a new **Credential** in Settings → Credentials (choose the CometAPI credential type if the node provides it) and paste your CometAPI token.
### Option B — Manual installation (when GUI install not available)
1.SSH into your n8n host/container.
2. Install the package in the global n8n `node_modules` or your custom folder :
- Go to Settings (bottom-left) > Community nodesClick “
- Install a community node”
- In “npm Package Name”, enter: `@cometapi-dev/n8n-nodes-cometapi`Check the risk acknowledgment boxClick “
- Install”After installation, you can search for “CometAPI” in the node panel.
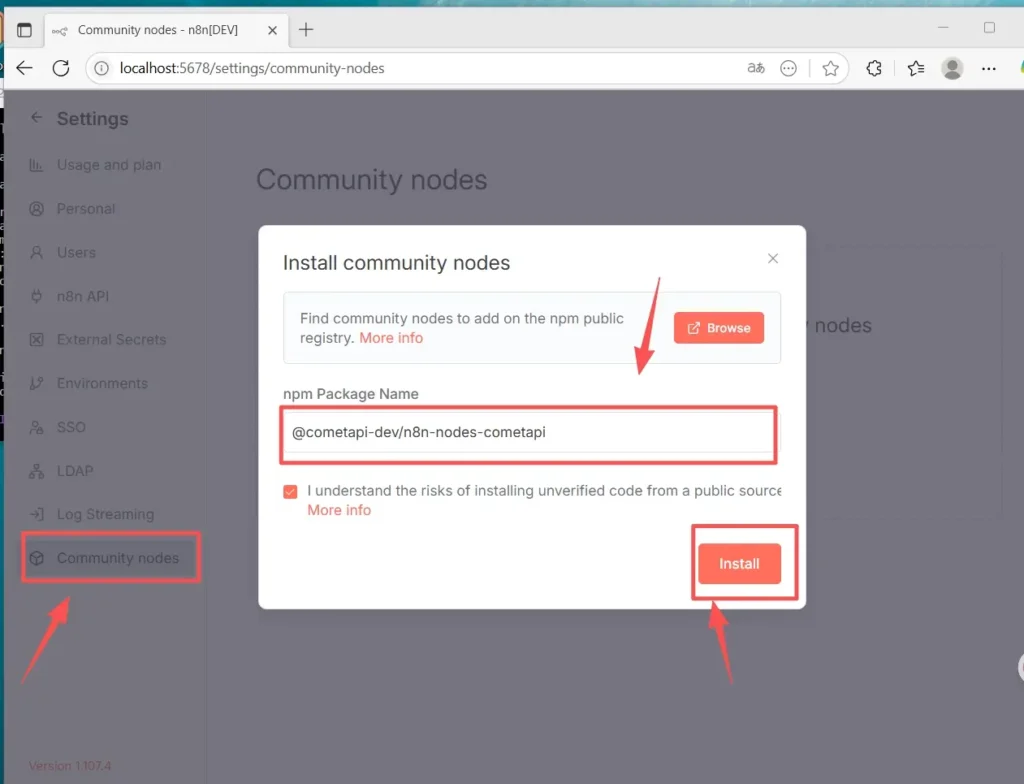
3.Restart n8n. If your instance runs in queue mode, you must follow the manual-install route described in the docs.
### How to check the node is installed
- After restart, open the nodes panel and search for “CometAPI” or “Comet”. The node will be marked as a community package.
- If you can’t see the node: verify that your instance owner account is used (only instance owners can install), or that the node package installed without errors in the container/image logs.
## How to Create a workflow and configure the API
### 1. Create a New Workflow
- Log in to your n8n instance ( self-hosted).
- Click **“Add Workflow”** to start a fresh automation canvas.
### 2.Add Node
- Add a trigger node: search for “Manual Trigger” or “When clicking ‘Execute workflow’”.
- Click the “+” on the right side of the canvas and search for “CometAPI” to add the node.
- You can also search “CometAPI” from the left node list and drag it onto the canvas.
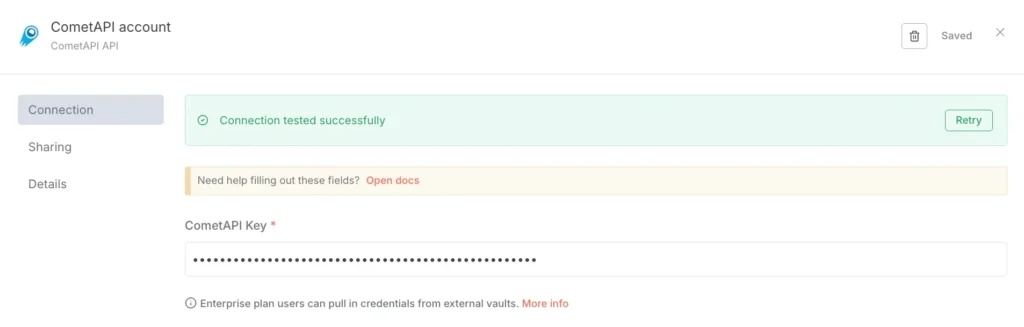
### 3.Configure credentials (first time only):
- In the CometAPI node, under “Credential to connect with”, choose “Create new”.
- Paste the token you created in the CometAPI console into “CometAPI Key”.
- Save. The Base URL defaults to https://www.cometapi.com/console/ and typically needs no change.
### 4. Configure model and messages:
Model: enter a supported model, e.g., `gpt-4o` or `gpt-4o-mini`.
Messages: You need to fill in role and context, and you can choose user or system for Role
Optional parameters (as needed) have: Maximum Number of Tokens (e.g., 4096) ; Sampling Temperature (e.g., 0.7); PenaltyStream (enable/disable streaming). For specific parameter documentation and explanations, please refer to the [CometAPI documentation](https://api.cometapi.com/doc).
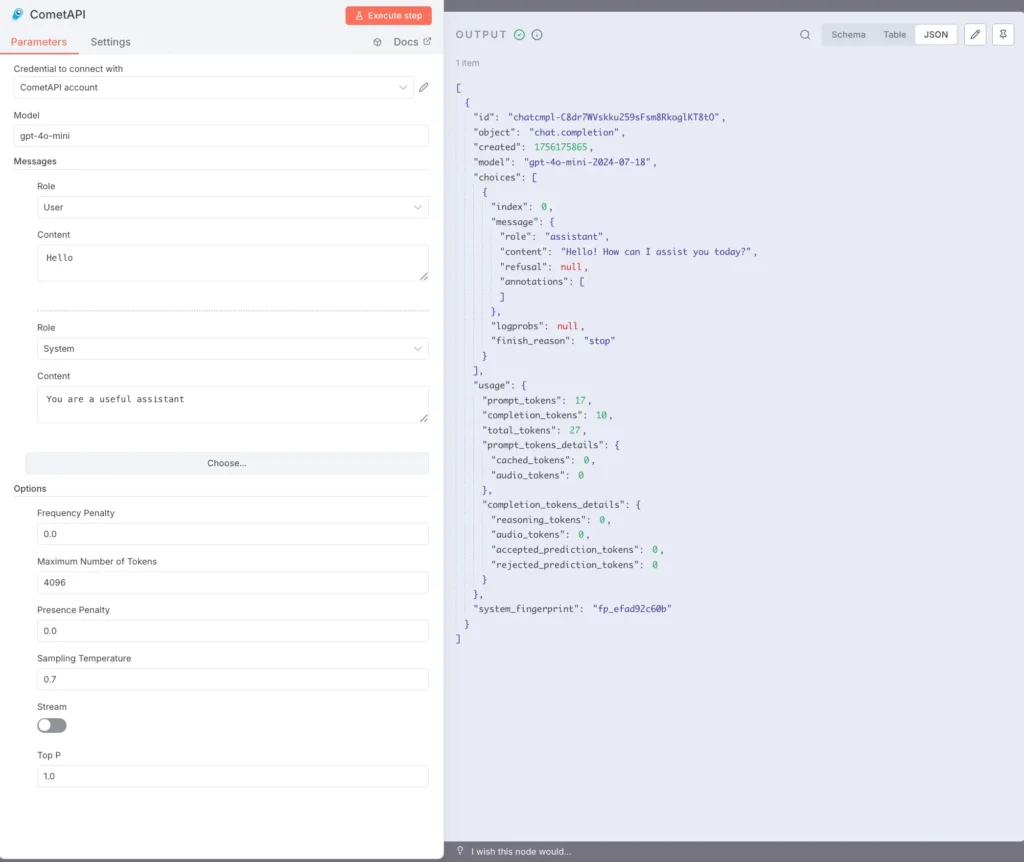
### 5.Text execution:
Select the CometAPI node and click “Execute step”, or click “Execute workflow” at the bottom.
The OUTPUT panel on the right should show a JSON response (including choices, usage, etc.).
You have now installed n8n(Recommend) locally on Linux via npm, installed and configured the CometAPI community node, and can run workflows that call models such as gpt-4o to receive responses.
## What are common problems and how do I troubleshoot them?
### 1) “401 Unauthorized” or “Invalid API key”
- Confirm the exact token string in your CometAPI dashboard (there can be similarly named tokens). Copy → paste into n8n credential and restart node if necessary.
- Ensure Authorization header format is `Bearer sk-xxxxx`.
### 2) Community node won’t install / “queue mode”
- If your n8n runs in **queue mode**, the GUI install can be disabled; follow the manual installation doc to install community nodes via npm or build a custom image that includes the node. Restart n8n after installation.
### 3) Node not found in palette after install
- Restart n8n.
- Make sure you installed the package in the correct context (inside the container image or in the `.n8n/custom` path if using that pattern).
- Check container logs for module resolution errors.
### 4) Rate limits or quota issues
- Check the CometAPI dashboard for usage and quota.
- Implement exponential backoff and fallback to cheaper models when you detect limit warnings or HTTP 429s.
## Are there alternatives if the community node isn’t available or you want more flexibility?
Yes — you can always use the **HTTP Request** node directly (full control) or an [OpenAI node with base URL](https://apidoc.cometapi.com/n8n-965890m0) redirection (practical shortcut). Using raw HTTP also makes it straightforward to adopt new CometAPI endpoints as they are released (e.g., image/video endpoints).Please refer to [Guide](https://apidoc.cometapi.com/n8n-965890m0).
**See Also** [How to Use n8n with CometAPI](https://www.cometapi.com/how-to-use-n8n-with-cometapi/?utm_source=chatgpt.com)
## Conclusion:
CometAPI gives you model choice and operational simplicity; n8n gives you visual orchestration and extensibility. Use the OpenAI credential trick for quick chat/completion integration, and community nodes where they exist and are trusted. Instrument every workflow for cost, latency, and security; prefer human fallbacks for decisions that matter; and keep your model selection dynamic so you can adapt to fast-moving changes in the AI vendor landscape. The combination of n8n and CometAPI is powerful, but like all powerful tools, it needs guardrails—observe, test, and iterate.