
In 2025 the AI tooling ecosystem continues to consolidate around unified APIs and visual workflow builders. CometAPI is growing as an “all models in one” developer-facing gateway (advertising access to hundreds of models), while BuildShip keeps expanding its visual workflow and node ecosystem to let teams ship backend APIs and AI workflows with low/no-code and secure secret management. These trends make integrations like BuildShip → CometAPI increasingly attractive for rapid prototyping and production deployment.
What is BuildShip and how does it help with AI workflows?
BuildShip is a low-code/no-code visual backend and AI workflow builder that lets you design, test, and ship APIs, scheduled jobs and backend automations using a node/flow editor. You construct workflows by chaining triggers, logic nodes, API calls and outputs; you can export workflows as production APIs or run them on BuildShip’s hosted environment. BuildShip supports both built-in “keyless” nodes for rapid prototyping and custom nodes that take secrets/keys for production calls.
Why this matters: BuildShip reduces the friction of wiring event triggers (webhooks, file uploads, scheduled jobs, form submissions) to downstream model and API calls, so teams can iterate faster on AI features without wiring server infrastructure from scratch.
What is CometAPI and why would you use it?
CometAPI is a unified API gateway that aggregates access to a very large catalog of AI models (text, image, audio, video) from many providers through a single, consistent REST interface. The platform advertises simplified authentication, usage dashboards, and the ability to switch between models with minimal code changes — appealing to teams who want vendor flexibility and easier experimentation.
Why this matters: instead of wiring separate SDKs and request formats for OpenAI, Anthropic, Stability, Midjourney, etc., you can write one integration and route to different models. That’s powerful for A/B testing models, cost-optimizing requests, or building fallbacks for resilience.
The CometAPI node in the BuildShip community library is a prebuilt node published by the CometAPI community account — it wraps CometAPI text & chat endpoints so you can send prompts/instructions and receive LLM responses inside a BuildShip workflow without hand-coding HTTP calls. (You can also use BuildShip’s generic API Call node if you prefer to write a little more custom logic.)BuildShip gives a visual canvas to arrange data flows; CometAPI gives a single endpoint to call many models. Put together, you can prototype complex multi-model pipelines in hours instead of weeks.
What Preparation do you need before you start?
Make sure you have the following in place before integrating BuildShip with CometAPI:
Account & access
- A BuildShip account (team or personal) with permissions to create workflows and connect nodes. If you plan to deploy to your org, you may need org admin privileges.
- A CometAPI account and an API key. Keep the key secure—treat it like any other bearer token.
Platform knowledge & tooling
- Familiarity with BuildShip’s visual editor (creating workflows, adding nodes, saving/deploying). If you’re new, clone an example template from the BuildShip community to get started faster.
- A basic understanding of REST APIs and JSON payloads for configuring the CometAPI node (model, prompt/inputs, temperature, max tokens, etc.).
- Optional: a staging environment or sandbox plan (on CometAPI) to avoid consuming production tokens while testing.
Security & operational considerations
- Make sure secret storage is available in BuildShip (or your CI/CD) to store the CometAPI key rather than hardcoding it in a node. BuildShip supports secret/credential storage in workflows—prefer that.
- Decide how you’ll monitor usage: CometAPI has dashboards; BuildShip logs and exported API endpoints can be instrumented with observability tools.
How do you integrate BuildShip with CometAPI? — Step-by-step
Below is a practical integration pattern you can implement in BuildShip today. I’ll follow the typical flow: create workflow, add a trigger, add the CometAPI node (from the community / marketplace), configure credentials, add output node, and test.
Step 1 —Get Account
• Log in buildship
• Log in to cometapi. Click “ADD API key” in the API keys to get your token key: sk-xxxxx
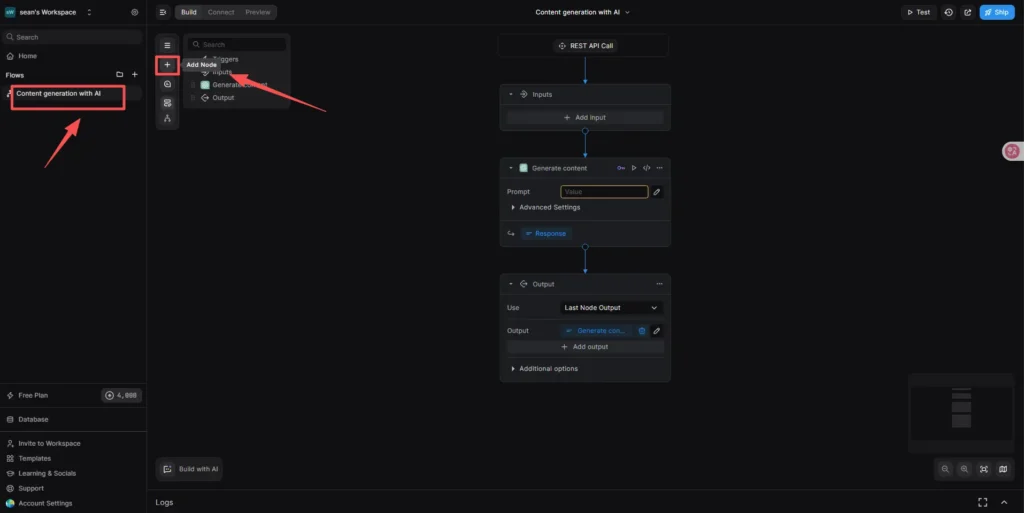
Step 2 —Create the Workflow and Add a Trigger
- Create a new workflow in the BuildShip console. Name it clearly (for example:
generate-content-cometapi). Pick the correct runtime/environment (staging vs production) and set the visibility (private to your team or public template). - Choose the trigger type depending on how the workflow will be invoked (HTTP API, scheduled job, webhook, or database event). For an API-driven content generator choose REST API Trigger for an HTTP endpoint so your front end or another backend can call it directly.
Step 3 — Add and configure the CometAPI node
You have two options: use the CometAPI community node (recommended for speed), or use BuildShip’s API Call node (recommended if you want full control).
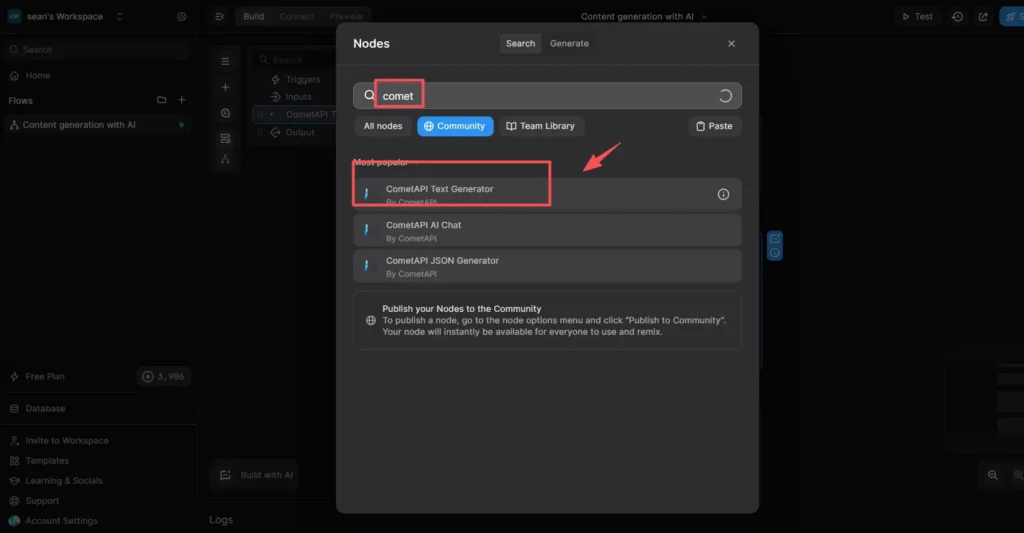
Option A — Use the CometAPI community node (quickest):
- Open the Community library or the Integrations search panel in BuildShip and search for
CometAPI. You should find nodes published by the CometAPI team / community such as CometAPI Text Generator, CometAPI JSON Generator, and CometAPI AI Chat. Use the one that fits your needs (text generation, structured JSON responses, or multi-turn chat). - Drag the chosen CometAPI node onto the canvas and connect it to the “Rest API” Trigger (and any preprocessor nodes).
- Configure node inputs: bind
prompt(from trigger input),model_choice(Click to expand Advanced Settings. In the Model field, enter the name of the model you want to use, for example), andmax_tokens/temperatureparameters - For the API key input: choose the argument that expects the API key — you’ll wire this to a BuildShip Secret (next section).
- Save the node and continue to secrets configuration.
Option B — Use BuildShip’s API Call node (more control):
- Add API Call node from Utilities. This node lets you craft a POST to
https://api.cometapi.com/...(the exact endpoint depends on CometAPI docs). () - Set headers (e.g.,
Authorization: Bearer <API_KEY>orx-api-key: <API_KEY>depending on CometAPI requirements). Use the node’s headers UI rather than embedding secrets in the body. - Build the JSON body using your workflow variables (prompt, context, instructions).
- Map the API response fields to BuildShip outputs for downstream use.
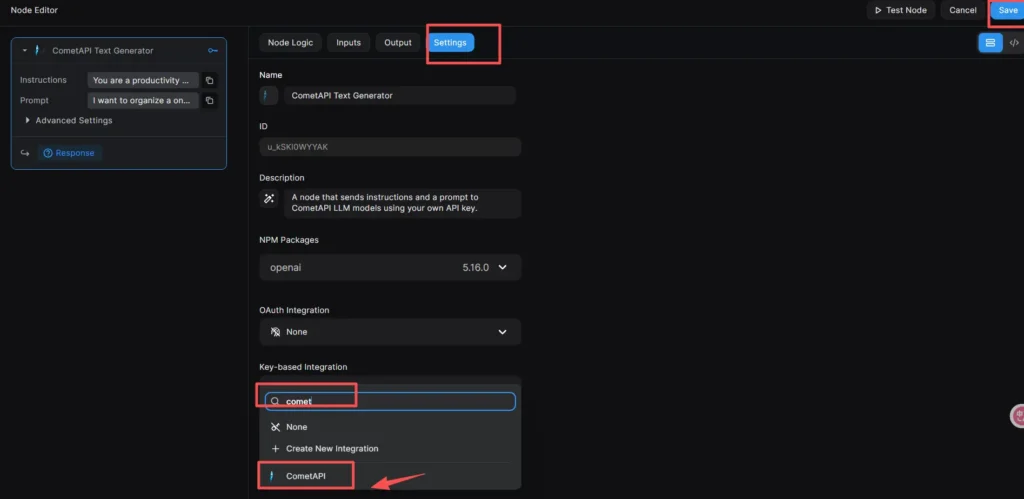
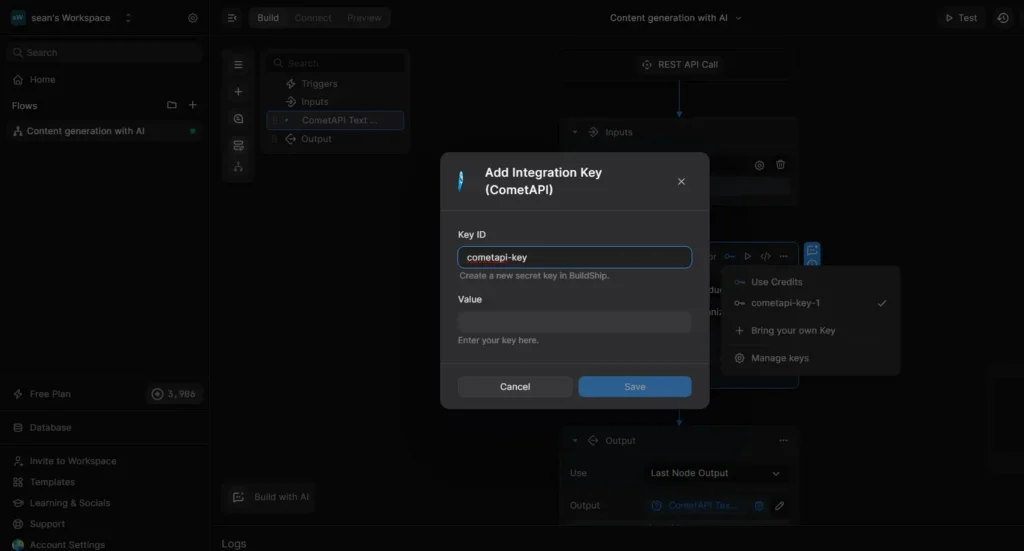
Step 4 — Add your CometAPI API Key securely in BuildShip
After adding the node, the core configuration requires two main parts: first, link the integration type, and then add your key.
First, Link the CometAPI Integration, this is a crucial step to ensure the node knows which type of key to use:
- Click the CometAPI Text Generator node on the canvas to open the Node Editor on the right.
- Switch to the Settings tab. Find the Key-based Integration section and click the dropdown menu.
- Search for or select CometAPI from the list.
- Click the blue Save button in the top-right corner of the editor. This step is crucial as it correctly links the node with CometAPI’s key management system.
Then, Add Your API Key:
- In the Node Editor, switch back to the Inputs tab (or you can operate directly on the node on the canvas).
- Click the key icon 🔑 area in the top-right of the node to open the key management dropdown.
- In the menu, select “+ Bring your own Key”. A dialog box designed specifically for the CometAPI integration will pop up.
- In the Key ID field, enter an easily recognizable name, for example, cometapi-key-1. In the Value field, paste the sk-xxxxx key you obtained from CometAPI.
- Click Save.
Step 5 — Add the Output Node
Step:
- Below the CometAPI Text Generator node, click “+ Add a new step”.
- Select the “Return Response” node.
- In the Body field, click the icon and select the response variable from the CometAPI Text Generator node.
After the CometAPI node returns a response, add JSON Parse node to extract the fields you want to return to callers (e.g., text or choices.text). Then connect to an HTTP Response node (if using an HTTP trigger) so the caller receives a structured JSON result.
Step 6 —Test
Use BuildShip’s built-in Test runner: supply example payloads (prompt + model choice) and run the workflow to inspect node-by-node logs and outputs. For REST triggers, run a curl or Postman request to the provided endpoint and observe the returned JSON, step:
- Click the Test button in the upper right corner of the workflow page to open the test panel on the right.
- Ensure the input format is JSON and fill in the input box with test data, Click the blue Test Flow button.
What are concrete use cases you can build by combining BuildShip + CometAPI?
1) Multi-model document processing pipeline
Trigger (upload) → Text extractor → CometAPI (summarize with GPT) → CometAPI (generate embeddings with a specialized model) → DB (store summary + embeddings). This combines specialized models for different tasks and uses BuildShip to orchestrate and persist results.
2) AI-assisted customer support
Webhook from support system → BuildShip pre-processing → CometAPI (generate draft reply, or classify intent) → Human-in-the-loop review → Post approved reply and store conversation history. BuildShip tutorials show building chatbots with memory and conversation management using workflow templates.
3) Multimodal creative generation
Workflow takes text + sample images → CometAPI routes to an image model (or video model) for generation → post-process → CDN upload. Using CometAPI’s multi-model catalog makes it easy to experiment with different image/video providers without changing BuildShip workflows.
4) Scheduled news briefs / automated monitoring
BuildShip scheduled trigger → gather sources (web-scrape / RSS) → CometAPI summarization → format → deliver via email or Slack. BuildShip has explicit tutorials for automated news and daily briefs.
What are best practices for production integrations?
- Secrets & rotation: Store CometAPI keys in BuildShip Secrets, rotate keys regularly, and limit scope/account permissions.
- Rate-limit & backoff: Add retry logic and exponential backoff in your node logic to handle transient API failures. Use BuildShip’s script nodes for custom retry loops.
- Observability: Log prompt/response hashes and token usage (but avoid logging full PII or sensitive prompt content). Track cost and error patterns.
- Model governance: Keep a small matrix of approved models (and fallback models) and a process for switching models in CometAPI without changing workflow logic. Version model choices to allow reproducible behavior.
- Sanitization & safety filters: Implement pre/post-filters (profanity, PII detection, unwanted content) before you surface outputs. BuildShip Script or Branch nodes are ideal for validation and policy enforcement.
- Testing & unit tests: Use BuildShip’s testing features and version control for workflows. Include unit tests that mock CometAPI responses so CI can run without incurring model costs.
Getting Started
CometAPI is a unified API platform that aggregates over 500 AI models from leading providers—such as OpenAI’s GPT series, Google’s Gemini, Anthropic’s Claude, Midjourney, Suno, and more—into a single, developer-friendly interface. By offering consistent authentication, request formatting, and response handling, CometAPI dramatically simplifies the integration of AI capabilities into your applications. Whether you’re building chatbots, image generators, music composers, or data‐driven analytics pipelines, CometAPI lets you iterate faster, control costs, and remain vendor-agnostic—all while tapping into the latest breakthroughs across the AI ecosystem.
To begin, explore the model’s capabilities in the Playground and consult the API guide for detailed instructions. Before accessing, please make sure you have logged in to CometAPI and obtained the API key. CometAPI offer a price far lower than the official price to help you integrate.
Ready to Go?→ Sign up for CometAPI today !
Conclusion
Combining BuildShip and CometAPI is a pragmatic way to accelerate production-ready AI features. BuildShip takes care of orchestration, secrets, and deployment; CometAPI unifies model access and reduces vendor lock-in. Together they let teams move faster from idea to serviceable product while keeping a handle on security, observability, and cost. Given the rapid pace of model churn and the growing diversity of AI capabilities, building workflows that are modular (trigger → model → post-process → output) and vendor-agnostic is the most robust approach you can adopt today.