
In the era of AI-driven workflow automation, combining n8n’s visual orchestration platform with OpenAI’s cutting-edge language models unlocks unprecedented possibilities. CometAPI—a newly launched AI model aggregation platform—addresses this need by unifying access to over 500 models under a single, consistent API interface. CometAPI promises ultra‑high concurrency, low‑latency responses, and simplified billing through a serverless architecture designed for enterprise‑scale workloads. Concurrently, n8n continues to cement its position as a fair‑code, source‑available workflow automation tool, offering hundreds of prebuilt nodes and a versatile HTTP Request node that empowers users to integrate virtually any RESTful service—including CometAPI—into visual workflows with minimal effort.
What is CometAPI and what recent news has shaped its capabilities?
CometAPI Launch and Core Features
CometAPI officially went live in 2024, positioning itself as an all‑in‑one gateway for generative AI, image synthesis, and specialized model families (e.g., Midjourney, Suno, Claude). The platform’s serverless backend enables horizontal scaling to handle millions of concurrent requests while maintaining sub‑100 ms latencies under load. Organizations can sign up for a free tier to evaluate the service, then scale up usage with predictable, unified billing—eliminating the complexity of juggling multiple provider invoices .
Recent Developments in Model Aggregation
Since launch, CometAPI has rapidly expanded its catalog to include the latest open‑source and proprietary LLMs, vision‑and‑audio models, and multi‑modal capabilities. Just weeks ago, the platform announced support for new reverse‐engineering endpoints, allowing users to repurpose model outputs for fine‑tuning or embedding generation without leaving the CometAPI ecosystem. This continuous expansion underlines CometAPI’s commitment to vendor‑agnostic AI adoption.
Why integrate CometAPI with n8n?
Unified AI Access in Visual Workflows
n8n’s drag‑and‑drop canvas and node‑based approach make it simple to orchestrate complex, multi‑step workflows. By leveraging CometAPI through n8n’s HTTP Request node, teams can call any model—be it a text generator, image synthesizer, or embedding service—using the same node configuration. This unification accelerates prototyping, reduces maintenance overhead, and avoids the redundancy of creating separate nodes for each AI provider .
Cost and Maintenance Simplification
Managing direct integrations with multiple AI vendors often entails handling diverse authentication schemes, API rate limits, and billing models. CometAPI abstracts these differences behind a single API key and usage dashboard. When paired with n8n, this means you only need to configure one credential set within the n8n Credentials panel, drastically reducing operational complexity and the risk of misconfiguration .
How do you prepare to connect n8n with CometAPI?
Obtaining Your CometAPI API Key
- Visit the CometAPI dashboard at cometapi.com/ and register for a free account.
- Navigate to the API Keys section in your user settings.
- Copy the generated secret key—this will authenticate all your CometAPI calls within n8n.
Understanding CometAPI Endpoints
CometAPI offers RESTful endpoints organized by model type and operation. For example:
POSThttps://api.cometapi.com/v1/chat/completionsfor text completion across multiple LLMsPOSThttps://api.cometapi.com/v1/images/generationsfor image synthesis requestsPOSThttps://api.comet.com/sora/v1/videosfor video generation with sora.
Each endpoint accepts JSON payloads specifying the model identifier, prompt or parameters, and optional configuration flags. Familiarity with these endpoints will streamline your n8n node configurations .
What steps configure CometAPI credentials in n8n?
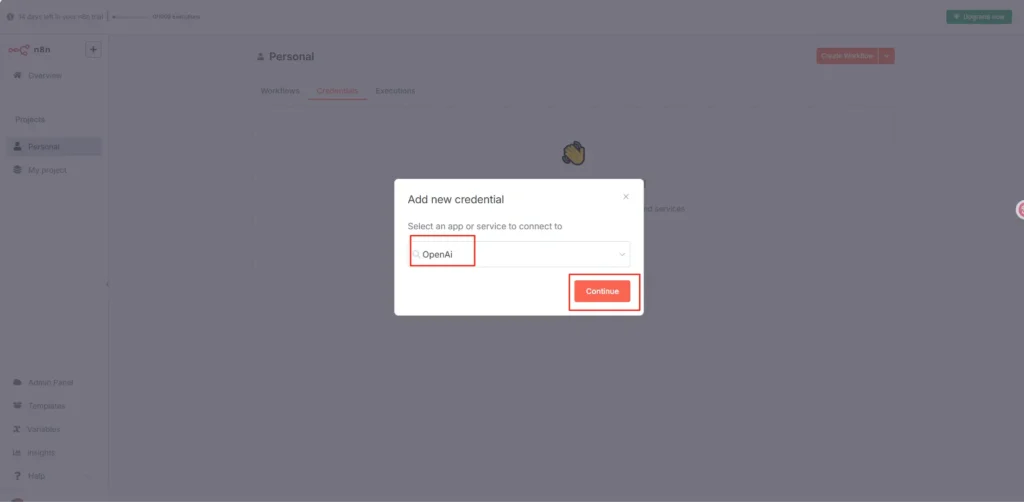
Creating and configuring OpenAI credentials
- Install the OpenAI credentials: In n8n’s Credentials section, click New Credentials and select OpenAI API.
- Provide API key: Paste your CometAPI API key into the API Key field.
- Enter
https://api.cometapi.com/v1in the base url field and click “Save”. - Scope settings: Choose whether to allow usage in AI Assistant workflows by setting
N8N_COMMUNITY_PACKAGES_ALLOW_TOOL_USAGE=truefor community MCP nodes . - Test credentials: Use the Test button to ensure connectivity.

Once configured, these credentials can be referenced by any CometAPI node—Chat Message, Completion, Embedding, or Image Generation—providing unified access to CometAPI’s models across all your automations.
What operations does the CometAPI support?
Chat Completion & Text Completion
- Chat Completion: Interact with chat‑optimized models (e.g.,
gpt-4o,gpt-4-1106-preview) by passing arrays of role‑based messages. - Text Completion: Send a single prompt string to models like
text-davinci-003for free‑form generation.
Embeddings
Generate vector embeddings for text (or images) to power semantic search, clustering, and retrieval‑augmented generation (RAG) workflows. Simply select Embeddings and map your input data.
Image Generation
Use Create Image to produce visuals from prompts. Specify size and count, and n8n handles the binary file output for downstream usage.
How can you build your first CometAPI‑powered workflow in n8n?
Prerequisites
- n8n Account: Ensure you have an active n8n account.
- OpenAI API Key: Obtain your OpenAI API key from your OpenAI account dashboard.
1.Create a New Workflow:
- Log in to your n8n instance.
- Click on “Add Workflow” to create a new workflow.
2.Add a Trigger Node:
- Choose a trigger to start your workflow. Common triggers include:
- Webhook: Initiates the workflow via an HTTP request.
- Schedule: Runs the workflow at specified intervals.
- Manual: Allows manual execution for testing.
3. Add the OpenAI Node:
- Click on the “+” button to add a new node.
- Search for and select the OpenAI node.
- In the node settings:
- Action: Choose the desired action, such as “Message a Model” for text completions.
- Model: Select the OpenAI model you wish to use (e.g.,
gpt-4,gpt-3.5-turbo). - Prompt: Enter the input prompt you want to send to the model.
4.Configure OpenAI Credentials:
- In the OpenAI node, click on “Add Credential”.
- Provide your CometAPI API key to authenticate the node.
5. Add Additional Nodes (Optional):
- Depending on your use case, you might want to add nodes to:
- Process Input: Use nodes like Set or Function to format or manipulate data before sending it to OpenAI.
- Handle Output: Send OpenAI’s response to other services like email, Slack, or databases.
6. Test and Activate the Workflow:
- Use the “Execute Workflow” button to test your setup.
- Once satisfied, activate the workflow to run automatically based on your trigger.
Example: Email Summarization & CRM Update
Another common use case is summarizing incoming emails and updating sales opportunities:
- IMAP Trigger: Poll a support or sales mailbox.
- CometAPI Model: Summarize the email content into a concise note.
- Notion / Odoo: Append the note to the relevant record in your CRM or note‑taking app.
- Slack Notification: Alert the responsible sales rep with a link to the summary ().
These scenarios demonstrate how n8n makes it trivial to chain AI operations with existing enterprise systems.
Conclusion
By marrying n8n’s flexible, low‑code automation with CometAPI’s unified AI model gateway, teams can accelerate innovation, simplify maintenance, and maintain full control over their workflows. Whether you’re building chatbots, automating content pipelines, or orchestrating multi‑modal AI tasks, this integration delivers a robust, scalable foundation for the next generation of intelligent automation.
We have prepared an integration document to help you quickly get started that n8n integration with CometAPI.